Search This Blog

Saturday, December 9, 2017

Coconut Honey Corn Bread

Can you tell I'm obsessed with coconut? I'm pretty happy being lactose intolerant if it means I can drink coconut milk instead! 
This is a sweet bread, but not so sweet you cant dip it in chili (imo). Its creamy and buttery and with honey notes and a soft texture with crunchy bits. Oh how I love crunchy bits!

Coconut-Honey Corn Bread
Makes 1 square pan

1 cup flour 
1 cup cornmeal
1 tsp baking powder
1 tsp salt
1 can coconut milk
1/4 c honey
2 eggs
1/2 stick of cold butter, diced
the fresh corn from 2 ears of corn 

Mix the dry ingredients (flour, cornmeal, baking powder, salt) with a whisk to incorporate. In another bowl mix the wet ingredients (milk, honey, and eggs), then stir in the corn and butter.
Dump the dry into the wet and mix gently to combine.
Pour into a greased pan (I use a square brownie pan)
Bake at 350 for 45 mins, until a toothpick inserted in the middle comes out clean.
If the bread is set but the top is a little light, you can let it sit under the broiler for a minute or two to get a nice color. You don't want to over-bake this, the texture is almost like corn pudding. (nobody wants dry cornbread!)


Eat this with chili. Or as dessert, drizzled with hot honey (or use for strawberry shortcake!).
Or just eat it because it's delicious.
 But do wait till it cools before cutting in.
Cheers


Toasted Coconut Hot Cocoa


This is such a simple recipe, technically like 3 ingredients (two if you don't add sugar) so the quality of ingredients and flavors can stand on their own. Get the good stuff!

The coconut: 

Whats better than an obsessive love of coconut? Finding out my favorite coconut milk brand makes coconut powder! Which, when toasted becomes a lovely golden yellow color with a sweet, nuttiness that is unique to toasted coconut. I use Chaokoh brand, sometimes found at the local grocery (comes in a brown can with white lettering), from Thailand, or local Asian grocery. You can order this stuff online too. I've even seen it in big bags, rather than these little cans I've got. If you're making a lot, go for the big bag.

Spread the powder in an even layer on a cookie sheet.
Set your oven's temperature to 300F and a timer for two minutes. (This stuff WILL BURN if you walk away from it. It's dehydrated milk!
)
Stir gently after two minutes and mix (mix outside in, to keep the edges from getting too brown and the middle still raw) and rotate your pan. Trust your nose, too, if it starts smelling really toasty, get in there and stir it.
After a few minutes of babying it, it'll be a lovely golden yellow color with some brown flecks and have the texture of sand. Let cool completely.


The cocoa:

 I love, love, loooove dark chocolate. But trust me that using 100% quality dark chocolate isnt your best option here. Mixing it with another cocoa powder not only makes it go farther (the good stuff is expensive!) but also gives you a better depth of flavor.
I Mix 1:1 - a good dark cocoa with another regular cocoa. For example, I used Hershey's special dark blend along with good ol' Nestle cocoa powder.

The sugar:

I had Turbinado on hand so I used that - similar to Sugar in the Raw.
I've read some people use Powdered Sugar, which may add a nice thickness to your drink, but its extra sweet so you may need to half the amount (personally, I hate the texture. Just me. It's like chalk. Don't judge...)
But, although I have not tested this theory yet, I think using dehydrated honey would add a beautiful luxurious sweetness to your cocoa. It comes in these crispy golden brown granules that melt in your mouth.
Another option may be just skipping the sweetener entirely and let people add their own to taste.
But, by all means, if you like white sugar, use white. It's all you, baby.


Toasted Coconut Hot Cocoa Mix
Makes about three 6oz jars of hot cocoa mix

2 cups cocoa powder (1:1 mixture dark and regular)
3/4 cup turbinado sugar
1 cup toasted coconut powder (see above)
big pinch of salt
tiny pinch of cayenne (trust me, do it!)

Whisk everything together in a big bowl to combine.
Transfer to gift jars.

Instead of getting those heavy glass jam jars, I found plastic freezer-jam jars at my grocery. I like them because the lids won't rust and you can clean them to reuse.
I did a little label on my jars with paint markers. I think its authentic and handmade looking with my terrible penmanship! Litte red bells with bows are so festive!
Add instructions on the back: "2 Tablespoons per 8oz cup of hot water or milk."


For a fancy twist, add a tablespoon of cinnamon and a tablespoon of espresso powder.
 Or go all in and toast some garam masala spices!


Friday, July 7, 2017

Boiled Peanuts... the wrong way

I live in Florida. It's brutally hot and humid this time of year. Ugh. Nasty. I hate summer. I know, I'm in the wrong state.
Not only do I have a tiny (I mean tiny like 3ft x 2ft space) kitchen at the moment, cooking isn't something I'm doing a lot of this season because it's just so damn hot. Sadface. I need something that doesn't take up much space, and something that doesn't generate a ton of heat.
So after much deliberation, I purchased an Instant Pot - an electric pressure cooker. Supposedly the best thing I could spend money on next to electricity or running water (there's a surprisingly huge fan club for these things). As a cook and someone who lives in a tiny space, I'm pretty excited about it's potential.
The very first thing made in this guy - Boiled Peanuts.
I've lived a lot of places but I'm basically a Southern girl. You get a craving for this dish once you've had it the right way once, and it will haunt you for the rest of your life. A wonderful snack, hot or cold, summer or winter and incredibly versatile with seasonings.
Truth is, there are about as many boiled peanut stands on the side of the road around here as churches in Texas (and most convenience stores have a corner with a steaming crock pot full of them) but, like most things, they're so much better if you make them yourself. I find a lot of places these days buy them pre-packaged in cans and heat them up. Eww.
Sometimes, when you're on the hunt for the flavor of your childhood, that good ol' soul food, your best bet is to figure it out yourself.

Here is the recipe, it's so easy you don't need to measure:
*Plug in your Instant Pot and open up a 1.5 pound (24oz) bag of roasted, salted peanuts in the shell.**See below
*Pour peanuts into the pot.
*Add water to cover peanuts and weight with something to keep them submerged. (I used the metal steam rack the Instant Pot comes with and a can of tomato sauce with the label removed). 
*Put the lid on, make sure the steamer nozzle is set to Sealing. 
*Set to the Manual mode and the timer for 90 minutes. 

That's it. No salt - these are already salted! As the liquid cooks down, it gets saltier. Don't add salt until they're completely done, and have a taste first. Add other seasonings if you like (again, watch the salt content) but that's the basics.
Store in an airtight container in the 'fridge for a week or as long as they last. Can be Canned and stored indefinitely (but they're better fresh). Serve cold or hot.
Tip: These are great on top of Chinese food!

**Ok now, before anyone freaks out... I do realize that 99.9% of all Southerners and recipes out there insist that you cannot under any circumstances use any other peanuts than Raw Green Peanuts.
I get it. But I couldn't find them at my local grocery and I wasn't about to go on a witch hunt for these things in this heat. I know it probably upsets a lot of folks. By all means, if you can find them, use the Raw Green ones - they're certainly superior.
But here I did it with the Roasted, and they were delicious.
Seriously, it works just fine. Get back in your grave, gramma.

I'm sure there are as many ways to make Boiled Peanuts as stars in the sky, but here are a few
Fun flavor combinations:
Traditional - Fresh garlic + garlic & onion powders + red pepper flakes
Cajun - Cajun Seasoning (such as Zataran's) + Crab Boil Seasoning (+ sliced fresh Jalapenos if  you want to die)
Curry - Curry Powder (or garam masala)
Beer Boiled - 1 bottle of beer per pound of peanuts + water to cover
Chili & Lime - Chili powder + lime juice + lime zest (or use Lucas if you can find it)
Porky - toss in cured/smoked ham products like ham hock

Friday, March 31, 2017

Banana Jam and Cold Noodles

Instagram makes me lazy. It's been way too long since I've written a post and way too much delicious food has gone unexplained! Instead of trying to backtrack and post everything I've missed... I'm just going to post what I did today.

Today I made Banana Jam!! Its so good! Basically it's bananas cooked up with some sugar and an acid (to keep them from getting brown). Simple. I roast my bananas, just as I like to do for banana bread. Brings out that flavor. You dont have to... but its tastier.

With two bananas I made enough for one person for a week, considering you eat toast every morning. Double, triple, etc this recipe to make enough for you. Totally not actually measuring anything but what I made is probably about 4 oz by volume, if that helps.


2 large bananas, roasted
1 Tablespoon sugar
1/2 teaspoon citric acid (or lemon/lime juice)
pinch of salt

Smash up roasted bananas in a small pot over med-high heat. Add in remaning ingredients and, stirring constantly, cook down until its thick, about 15-20m. 
Place into an airtight container to keep for up to a week.

You can also can this  stuff if you know how to do all that, and it lasts quite alot longer.
Here is a picture of my banana jam spread onto german dark wheat wholegrain toast with coconut-peanut butter spread.

Cheers


Oh yeah and my Cold Buckwheat noodles with Fresh and Pickled Cucumbers:


There's not a recipe to this, really, I found this Instant Noodle mix at my local Korean grocery in the refrigerated section... neat new stuff. So I had to try it! I added in the cucumbers and the egg.
This instant noodle has a mustardy-vinegary-sweet-salty kind of thing going on that is super refreshing in the hot summer. The actual serving suggestion on the package mentions not only cucumber but also thinly sliced cold cooked beef and thinly sliced pear. 
The proper name for these is Mul-naengmyeon <-- click for a recipe

Saturday, December 3, 2016

Orange Curry

Orange Curry
serves 4-6

1 cornish hen - cut into 8 peices
4 skinless chicken thighs - cut in 1/2
2 small or 1 large sweet potato, chopped
1 shallot or 1/2 onion, chopped
2 small or 1 large carrot, chopped
1/2 head cauliflower, chopped
6 cloves garlic, chopped

1 T curry powder (I use S&B)
1 T tomato paste
1 5.6 oz can coconut milk
2 t salt
zest and juice of 1 orange

1/2 gal water

In a pot big enough to hold about a gallon of liquid, heat over medium flame. Add curry powder and dry toast for about a minute, stirring often. Add in tomato paste and orange zest. Toast, stirring constantly, for another minute. Burns quickly, keep an eye on it!
Add chicken, garlic and onion, and coat with spice mixture, stirring constantly for 1-2 minutes.
Pour water and orange juice over chicken to cover. Bring to boil, then turn the heat down to simmer on low for about 30 minutes until chicken is tender.
Add in veg and cook another 10-15m until veg are tender.
Turn off heat, stir in coconut milk, season with salt to taste.

Add a little cayenne or fresh chilis or jalapeno if you'd like it spicy, depending on the spiciness of your curry powder or garam masala mix.


Serve with rice or garlic naan


Thursday, October 27, 2016

Semi-Homemade Trader Joes Dinner

Promise I'm not being sponsored by anyone. This is how I eat and how I cook.
Got the chance to go to Trader Joe's the other day, which, I always take if I can since I live a good hour or so from the nearest one. That place always inspires me, and its typically pretty inexpensive.
I don't cook with recipes and I don't have a lot of time today, so todays' post is going to be train-of-thought, the way I do it when I actually cook. Leave a note if you'd like a proper recipe or have any questions, and Ill key one in later.

You'll need:
Precut butternut squash
Premade three cheese ravioli
chicken-and-apple sausage
leeks
garlic
vegetable oil
butter
salt to taste


Heat your handy-dandy nonstick saute pan over medium heat. Add in a teaspoon or so of vegetable oil. When it's hot, lines will form in it when its tipped (also when you add things in, it goes 'ssssss!').
Add in a handful of chopped leeks, garlic, and couple of sliced chicken-and-apple sausages. Saute until browned, stirring every few minutes with your (handy-dandy) silicone covered tongs (wins my best tool EVER! award). Remove from pan.
Put pan back on heat and toss in a small chunk of butter. Add in your TJ's pre-made ravioli and the chopped butternut squash. Splash in a little water. Cover and let steam until squash is soft (5 minutes ish). If water runs out before the squash is soft enough, add in a little more and deglaze (gently lift ravioli from bottom of pan if they get stuck).
Add sausage mixture back in and toss to coat.
Serve ona paper plate. Be sure and take a picture before you eat.
...But don't be a perfectionist, your food is getting cold!


*Tip: If you want to get real fancy - do a brown butter and cream sauce with a little sage or thyme. 
Brown butter= cook butter until its browned but not burnt. Add in herbs, splash of cream, pinch of salt.


Wednesday, October 26, 2016

Crispy beef with garlic

Another easy boat meal. My current kitchen setup on the boat is:
one butane portable camp stove
one large pot with lid
one small pot with lid
one nonstick saute pan with lid

Possibilities=endless. I actually have a lot of kitchen equipment, considering I live in a tiny space. I also own a small electric griddle and a small toaster oven as well. However, one could easily get by with just a small pot or saute pan.

Crispy Beef with Garlic
serves 2

1/4 # ribeye, cubed
1/2 onion, sliced
1 cup chopped pickled veg (See below)
1/4 c sliced mushrooms
4-6 garlic cloves, sliced thinly
1 TB brown sugar
2 TB soy sauce

1/4 c Cornstarch
ziplock baggie
1/2 t Salt
2-3 TB vegetable oil

1. Place cubed steak into ziplock baggie (or a lidded container, whathaveyou), add in cornstarch and salt. Seal and shake to coat meat with starch mixture.
2. Heat a saute pan over medium heat. Add oil. When oil runs in lines when pan is tipped, its hot enough (also it goes 'sssst!' when you add the meat). Shake excess starch off of meat and add to oil. Cook until browned and crispy on all sides, about 5-8 minutes. Remove from pan.
3. Add in all vegetables to pan. Saute for 5-8 minutes. If using harder vegetables such as carrots or broccoli stems, add in about 2 TB of water and cover to steam for 3-4 minutes to soften. 
4. There should be a little liquid left in the pan (if not add a little splash of water). Toss in the brown sugar and stir a few minutes till the sugar melts, then stir in the soy sauce. If sauce is too watery, let it cook down another 3-5 minutes until it gets the consistency youd like.
5. Add the beef back in and stir to coat with sauce.

*optional: Serve with rice or noodles

Pickled Veg
In a glass jar with a tight fittind lid... --> this is mine
1. Stuff in as many veggies as you can. 
2. Pour over a solution of 2:1 vinegar to water, plus salt to taste.
For example: 1 cup vinegar, 1/2 c water, 1 teaspoon salt.
***Secret ingredient! Add in a splash of kombucha.
3. Seal with lid and refrigerate about 3 days. 
EAT!

I use whatever veg I have on hand or is cheap at the store. Some I have used include a mixture of: broccoli (stems are vegetables too! chop them up), carrots, cucumber, cauliflower, onion, cabbage, radish, sweet potato (yep! let it sit a few days longer), beets (it will turn everything pink. everything!).

The great thing about these pickled veg is... not only are they incredibly easy and cheap but they're super healthy for you. Active cultures from the kombucha go to work immediately, making these taste great and do wonders for your body. Even if you can't find kombucha, no worries, vinegar is good for you too!
Reuse the pickling solution over and over and it will develop its own excellent flavor and health properties.

Tuesday, May 24, 2016

Gorgeous, Soft Muffins

You know the drill. Thoughts in your head of almost cupcake-like muffins, sweet and soft and fluffy... only to bake up heavy, dense hockey pucks. Can't-even-gulp-them-down-with-a-glass-of-milk... amiright? Nobody likes that.

One way to soften up your muffins and cakes alike and give them nice leavening (think fluff!), is to add in whipped cream. Fluffyness and flavor in one. I learned this method from Shirley O Corriher's infamous book, Bakewise, and the below recipe is based on her's. Great book, lots of nice techniques and a neat explanation of science.
Sure you can use egg whites, whipped to medium peaks and fold in. This works. But the texture is a bit more stiff (think meringue) and it has a decidedly egg-y flavor. Whipped cream is where it's at. It's an easy extra step that you can even do up to a day or so in advance (whipped cream will keep in a cold refrigerator for a day or so).

Tip: Give it a hot flash: With most quick-breads, including biscuits and muffins, I highly suggest preheating the oven to 25-50 degrees hotter than you'll actually bake with. This ensures a really hot oven when your beautiful pastry goes in, giving it an important initial lift, helping them to rise UP instead of OUT from the very beginning.

Ingredients

2 c flour
2 t baking powder
1/2 t salt
1 c sugar
1 egg
1/3 c oil
1/3 c buttermilk
1 t vanilla extract
2 ripe bananas, mashed
1/2 c heavy cream

sanding sugar for topping, optional

Preheat your oven to 425 degrees F. Prepare a muffin tin for baking (spray, flour, liners, whathaveyou).

1. Mix dry ingredients: flour, baking powder, salt, sugar, in one bowl.
2. Mix wet ingredients: egg, oil, buttermilk, vanilla, and bananas in another bowl.
3. In a third bowl, whip cream to medium peaks.
4.  Beat together wet and dry ingredients with a hand or stand mixer.
5. With a spatula, fold in 1/3 of the whipped cream to the other mixture until most of the white streaks are gone and its mostly incorporated.
6. Fold remaining whipped cream into batter until, again, most of the white streaks are gone and batter is a pretty uniform color.
7. Spoon into muffin cups, all the way to the top. Ideally, use an ice cream scoop, but a regular spoon works too. Optionally, sprinkle sanding sugar on top.
8. Lower oven temperature to 400 degrees F. Bake about 20 minutes, until cake tester inserted comes out clean.


Thursday, May 12, 2016

Bread in 5: Garden Focaccia

For the Focaccia:

Pull a melon-size (1 1/2- 2#) piece of dough from your stash. Shape into a pizza pan, let rest to room temperature, about 1 hour.

Make Ninja Claw hands 
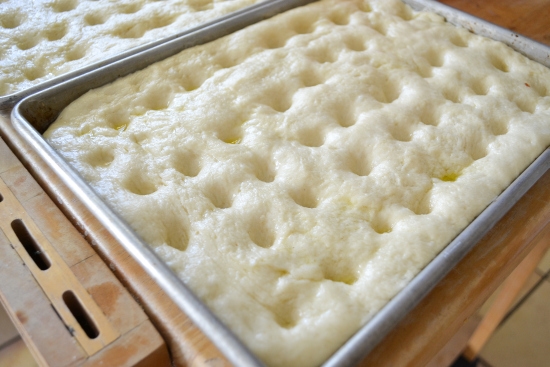
and poke holes in the focaccia with the tips of your fingers.

Like so. Drizzle on Olive Oil and spread on Pesto.
Bake Focaccia about halfway, 10-15m, remove from oven and add toppings. 
Bake another 15m. 

Optionally, but highly suggested - turn on the broiler and (watch carefully!) toast the toppings for another 5-8m until you get a nice golden brown here and there, but not burnt (watch carefully!). This will add crisp to the edges of your toppings and a bit of toasty flavor. Yum!

Toppings:

Top with fresh ingredients from your garden (or your friend's garden, shh!). 

Here, I used pesto, blanched fresh green beans, shaved potato, cream cheese and pickled red onion.


Pesto:


Okay Pesto is one of those things that's incredibly complicated and time consuming to make...  Is what I would say if it wasn't incredibly simple and quick!
And with a food processor, you can make delicious fresh pesto in seconds. 

Go with a ratio on this one, that way you can be creative with your ingredients:

The basic ratio is 1:2:2:8 
(1 part nuts, 2 parts oil, 2 parts grated cheese, 8 parts leaves or herbs)

For example:
3 or 4 Tablespoons nuts
1/4 c oil
1/4 c grated cheese
2 cups herbs

To this mixture, I'd add in 2-3 cloves of garlic, 1 Tablespoon lemon juice and two or three pinches of salt, to taste. 
Pulse up everything in your food processor. Taste. Add extra salt or lemon juice and taste again if needed. 

Traditional pesto includes: basil, olive oil, salt and pine nuts. 
But you can use any combination of greens and herbs, oils and nuts. I tend to use whatever I have on hand. 
I've made lovely pesto with unsual ingredients such as:
>Mint and Radish Greens, Olive Oil and Pistachios.
>Rosemary, Walnuts, Pecorino and Olive Oil.
>Dandelion Greens, Basil, Parmesean and toasted Pecans

I encourage you to try different things until you find a fun combination that you really like. 

Weird tip: If you find your pesto is too thick, but already has a lot of oil in it, add in one or two ice cubes and pulse with food processor.

If you make focaccia and stop with just olive oil and pesto toppings, you're good. 
But here are a few more topping suggestions:

Shaved Potato:

Slice on a Mandolin for best results. 

You want your slices to be super thin, almost transparent. Soak the slices in a bowl of cold water for about an hour. This will remove excess starch, which will help them bake up nice and crisp.
Note this is also how you make great fries.

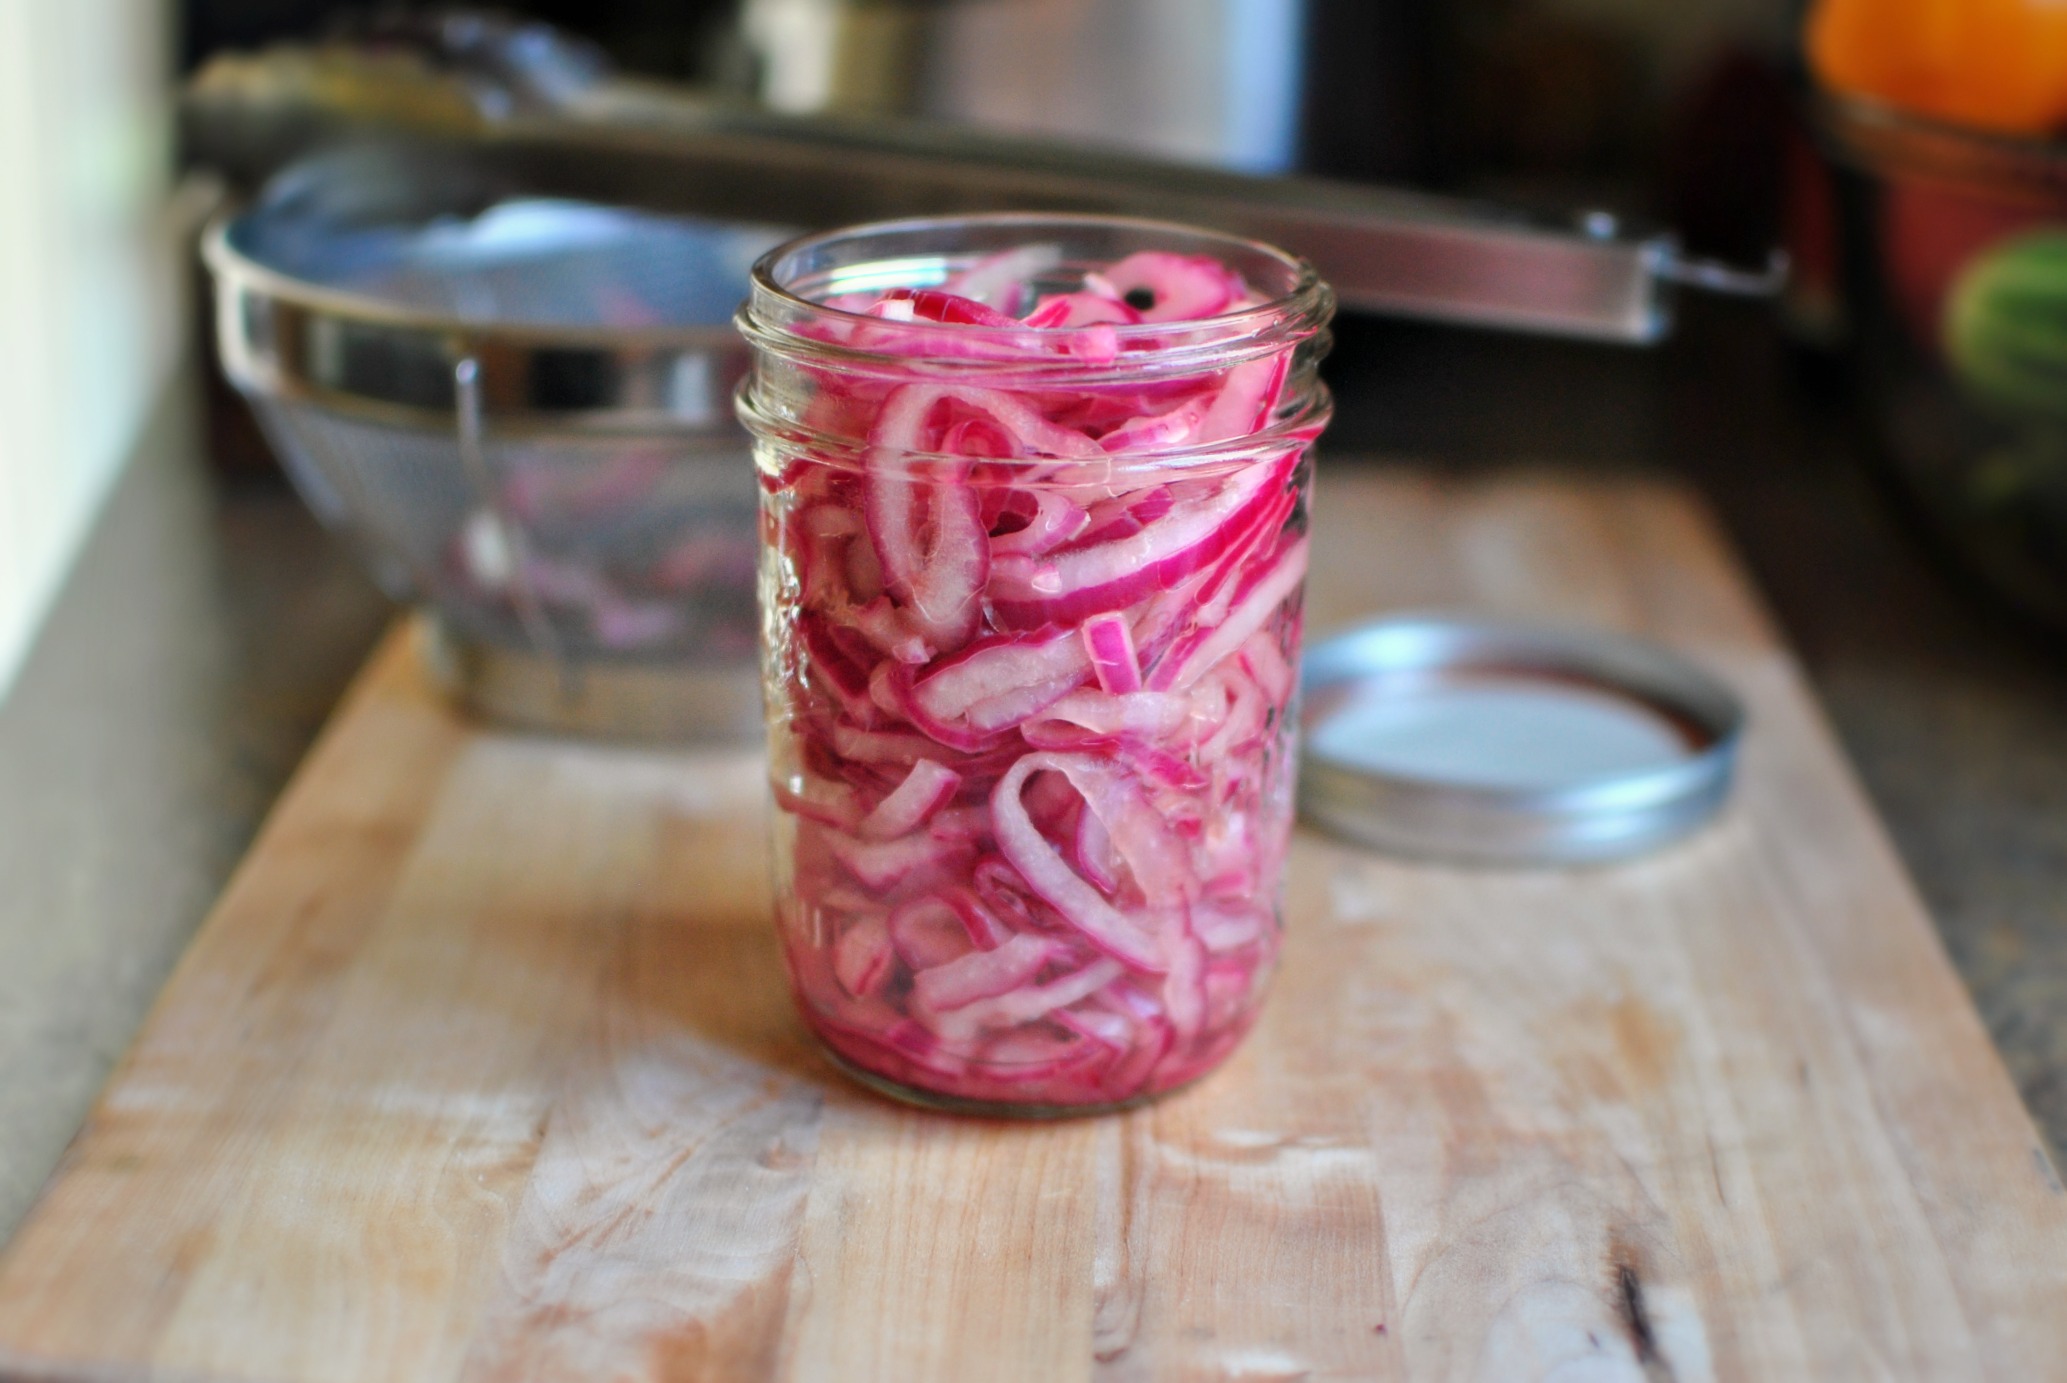
Pickled Red Onion:


2 Parts Vinegar
1 Part Water
plus sugar and salt to taste
Heat ingredients in a pot or microwave safe bowl, just enough to dissolve the sugar. 

Optional add ins: Jalapenoes, peppercorns, lime slices

Fill up a glass jar with shaved red onions (cut them thinly on a mandoline). Top with vinegar mixture. Secure lid and refrigerate for 1 hour, up to 24 hours before eating. Will keep for about a month before it gets super onion-y tasting.

Tip: PICKLE ALL THE THINGS. This basic pickling ratio is good for basically any kind of pickle. A real Southern treat is pickled cucumber and pearl onions, often served as a side dish in Southern American cuisine. 


Monday, October 26, 2015

Candied Things

Candy-ing is something people used to do to preserve things. To be really science-y, it enhances desiccation and creates an unfavorable environment for bacteria. Takes some moisture out and keeps it from going bad. Y'know, like salting or curing. Only with sugar. Glorious sugar.
Follows is a recipe but, to break it down, you are going to simmer sliced citrus in a simple syrup.

What to do with these beautiful fruit-gems? Eat them! Yum. Roll them in sanding sugar for a pretty decoration on cakes. Chop them up and use them in cookies or batters. Cover them in chocolate and, yes, eat them.

Candied Lemons

2 cups sugar
2 cups water

2 lemons (or other citrus), sliced thinly - 1/8-1/4"

Bring sugar and water to a simmer over medium heat. Add in lemon slices. Simmer for 45 minutes to an hour until slices become translucent (see photo below).
Carefully remove lemons from syrup (use tongs or a small sieve), drain and dry on racks with parchment underneath to catch the sticky stuff.
Store in an airtight container for about a month.

Please be careful with boiling sugar syrup. Boiling sugar syrup is Lava. Lava really hurts and leaves nasty blisters down your legs and feet. Just sayin'.

Candied Nuts

Tons of ways to candy nuts, including using egg whites, boiling in sugar syrup or even frying. I like this way because it is simple and doesn't use a lot of ingredients. And I love the flavor when they are toasted in the oven.

2 cups of nuts (walnuts, pecans, whatever)
1/2 cup sugar
1 tablespoon water

Preheat oven to 375 degrees F.
Line a cookie sheet with parchment, spray liberally with non-stick spray.
In a small pot, combine water and sugar. Stir with heatproof spatula or wooden spoon,until sugar is dissolved. Add in nuts, fold together with sugar to coat.
Spread onto cookie sheet in a single layer. 
Bake for 10-15 minutes, until nuts are toasted. 
Cool completely before eating them! It's worth the wait.
Feel free to break up the nuts as they cool, with your spatula or spoon, to keep them from clumping together. The sugar coating will get hard as it cools completely and its harder to break them up once they're cool.
Store in an air-tight container for up to a month.

'dees nuts.
Again, great in baked goods or covered in chocolate or just eat them as they are. 

Cheers <3

Breakfast Prep: Blah-Blah-Blah- Protein Muffins

Everybody loves a good muffin in the morning. The kind filled with butter and sugar and.. dare we drool over some freshly made tender-crisp struesel... Ah the butter. The BUTTER. Just... not every day.
Realistically, there are much better, healthier options. This is one of them. Filled with protein and good-for-you stuff, they'll help keep you energized throughout the day and keep those awful sugar crashes at bay. And they taste good, duh.
These are a simple, one bowl, sort of deal. So, whatever you happen to have in stock in your pantry, such as leftover ingredients from whats-on-sale-at-Trader-Joe's Granola. Totally not advertising for them but... seriously one of the best places to get inexpensive dried fruit, nuts and seeds. Check em. Meanwhile... Muffins...
Specifically: Peanut Butter Chocolate Craisin Pumpkin Oatmeal Protein 'Muffins' Yeah, okay, you can just call them Oatmeal Protein Muffins. The other stuff is basically customize-able. So I'll break the recipe up into two parts, the Base and the Add-ins. Note that whatever Add-In's you end up using, it should equal up to about 1.5 cups of stuff. Too much and they wont set properly, will be super crumbly. Too little is no fun.

Oatmeal Protein Muffins

This recipe makes about dozen regular sized muffins. 

The Base (all about that.. yeah.. ok sorry)
1 egg
1 cup pumpkin (OR 1 c applesauce OR 2 bananas OR 1 c greek yogurt [or combination thereof])
1/2 cup peanut butter (none of that sugary junk, buy the Natural. Check the label for sneaky sugar!)
1 1/2 cups rolled oats
1/4 c Chia seeds
1/4 c protein powder (I used chocolate)
2 teaspoons baking powder
1 1/3 cups almond-coconut blend milk (or, yknow, milk)
1/2 teaspoon salt


The Add-Ins
1/4 cup sunflower seeds
1/2 cup chopped dark chocolate
1/2 cup craisins
1 teaspoon cinnamon
1 teaspoon vanilla extract

Preheat oven to 350 degrees F.
Mix together Base ingredients.
Fold in Add-Ins.
Spray muffin tins with non-stick spray.
Spoon batter into tins- you can fill them to the top, they won't rise much.
Bake 30 - 35 minutes until set.
Cool completely and wrap any leftovers.
Good for about a week.

Try this:
Spread this batter in a loaf pan and bake it. Oatmeal Protien Loaf, yeah. Slice and toast. Spread with butter, because butter. Give it another 10 or 15 minutes in the oven to set. I've never done this but.. seems like it would work fine. Somebody try it and let me know.

Thursday, April 30, 2015

island style curry

CURRY!! It's so good. This one is super flavorful, with tender bits of chicken thighs.  For this curry,  it's important to use really flavorful veggies. I got mine at a local farmers market. The tomatoes were almost purple inside and smelled like heaven. The peppers smelled like peppers should smell. Half of the flavor comes from marinating the chicken in the veggie mix, the other half from the curry paste.
Use a curry powder and seasonings that you like the flavor of. It doesn't have to be expensive, just good. That's the beauty of this dish.

For the marinade: 

1 green bell pepper, diced
2 medium ripe tomatoes, or one large one, diced
4 or 5 spring onions, chopped (keep some aside for garnish)
1 scotch bonnet pepper, diced (optional) 
and/or a big squirt of Sriracha
2 or 3 pounds boneless, skinless chicken thighs
juice and zest of 1 lemon (or lime)
salt

Wash your chicken in cold water. Cut off any fat, optionally. Slice or dice, however you like your chicken. Season liberally with salt and lemon or lime juice and zest. Mix in veggies. Cover and let sit at least an hour, up to a day or so, in the refrigerator.

For the curry:

2 tablespoons madras curry powder 
2 tablespoons Goya Adobo all-purpose seasoning (careful with this stuff, its salty!)
2 tablespoons Turmeric 
1 tablespoon allspice
1 cup water

2 tablespoons oil

Mix spices and water together to form a wet soup. Let it sit for 10 minutes or more while you prepare other things, or browse facebook or etc.
Heat a dutch oven to screaming hot. Add oil. When oil is hot, add in curry soup. Careful, it may splash and its very hot! Let cook about 5 minutes, stirring constantly. You want most of the liquid to evaporate and the curry to become a paste, like mashed potatoes. 

When paste is ready, add in marinated chicken. Toss everything together to combine, so the yummy oily curry gets all over the chicken and there aren't any globs of curry paste left. 
Add in about 1/2-1 cup of water, if needed, to form as much sauce as you'd like. 
Let cook about 15 or 20 minutes, stirring occasionally, until chicken is tender and cooked through.

Serve with sticky rice, garlic bread or my honey + cornmeal muffins.

Keeps well for a week, tastes better every day.

Things to try:
Stir in a can of coconut milk in the last few minutes of cook time. 
If curry is too bland, add another tomato and a squirt of sriracha.
If curry is too salty, add in more water or coconut milk. 

Honey + Cornmeal muffins


Muffins are easy to make. There are just two really important things to remember: Don't over-mix the batter. And make sure your oven is at the right temperature. 
Baking powder makes things lovely and puffy in two ways. First, when it hits liquid, the powder causes a sort of Alkaseltzer reaction. Youll notice your batter becomes thick with big airholes in it as it is stirred. Secondly, baking powder reacts with the heat of your oven. To maximize the ultimate puffyness of your muffins, be sure you pop them in the oven as soon as you've got them in the pan. So be sure to prepare your pan before you mix the ingredients.
Baking at a high temperature helps the muffins get nice and tall in the oven, as soon as you put them in, because the baking powder reacts with the heat and makes things go UP. You'll also get that pretty dome top we love.
When you lower the heat, the muffin finishes cooking in the middle, but the lower heat keeps the outside from getting too tough.
This method works with most quick-breads, including biscuits, and helps ensure you get the best rise and still remain nice and soft. 

And always use real butter, so I guess that's three. 

Based on the recipe from KitchMe.
Makes 1 dozen muffins (or about 2 dozen minis)

1 cup cornmeal (i used white cornmeal. you can use yellow too.)
1 cup all-purpose flour
1 tbsp baking powder
1⁄2 cup granulated sugar
1 tsp salt
1 cup whole milk
2 large egg
1⁄2 stick butter, melted
1⁄4 cup honey

3 or 4 TB honey, melted in the microwave about 10 seconds, until liquid-y. 

Directions

Preheat oven to 400 degrees F. Place muffin paper liners in a 12-cup muffin tin, spray with nonstick spray.
In a large bowl, mix the cornmeal, flour, baking powder, sugar, and salt. 
In another bowl, whisk together the whole milk, eggs, butter, and honey. 
Add the wet to the dry ingredients and stir until just mixed. (Gently fold the batter together with a spatula, just until you don't see big dry spots)

Fill each muffin cup most of the way to the top.
Bake for 10 minutes at 400 F, then lower the heat to 375 F for another 5 minutes.

Optional but highly recommended: Remove pan from oven, gently brush tops of muffins with melted honey, bake again about 2 or 3 more minutes. Tops should be shiny and slightly sticky, even when cooled.


Wednesday, February 18, 2015

Snow Day Breakfast

With work and school, it can be hard to find the time to make a nice breakfast every day for my little fellows. Snow days are a great opportunity to spend time with my boys and make them something yummy to eat.  And I think cold weather might makes things taste better.


dutch baby
Previous attempts at Dutch Baby have been wildly unsuccessful. Today's turned out perfectly. It's a bit like a crepe batter [more eggs, less flour than pancake batter]. Also known as a German Pancake, I believe they are exactly the same as popovers, only without the special pan. These are crispy on the edges and creamy inside with a hollow center.

makes a 9" loaf pan size, which serves 3-4
 2 eggs
1/4c sugar
1/4c flour
1/2 TB sugar
1 tsp vanilla extract
1 TB butter

Preheat oven to 375. Melt the 1 TB butter and pour into pan. Mix remaining ingredients until smooth. Pour into pan and bake 15-20 min until golden brown. Batter will go from laying in the bottom of the pan to puffing up along the sides.


buttermilk molasses  syrup
I've made pancake syrup with corn syrup before and its hit or miss. Sometimes it tastes nice, other times its just too corn syrup-y. This kind of syrup is really more of a caramel sauce, which is a decadent way to dress up your pancakes, waffles or even toast. Amazing on ice cream too.
The molasses comes from the use of dark brown sugar, but if you dont have it, you could probably substitute the 1/4c water for molasses and get a similar flavor.

Makes about 1/2 cup of syrup.
1/2c dark brown sugar
1/4c water
1TB butter
1tsp maple extract
1 TB buttermilk
pinch of salt

Stir sugar and water together in a saucepan, bring to boil. Boil 2-3 mins. Take off heat, add in butter in pieces and buttermilk. Stir in maple extract and salt, mix till smooth and combined.
Keeps for a few weeks in an airtight container.


soft boiled eggs 
I learned how to make these from a book called Japanese Soul Cooking. They are often used in ramen, bento and make a damn tasty snack. The trick is the exact cooking time and starting the eggs in cold water, not dropping them into boiling water. Do it once and you'll be amazed how easy it is.

makes 4 eggs
4 eggs
pinch of salt

Poke a tiny hole in the bottom of each egg [the round part, not the pointy end] with a pushpin or needle. Place eggs in a saucepan, cover eggs completely with water. Bring to boil. Once it reaches a boil, let cook exactly 5 minutes. Drain the hot water and shock in cold water. Will keep in the 'fridge for several days. Peel and slice right at service time. Serve with a pinch of salt on each yolk.


Steamy coffee action shot! 


Sunday, September 7, 2014

Spicy Bacon Brittle

To make the Candied Bacon:

1/2 lb Thick Cut Applewood Smoked Bacon
1 c dark brown sugar
2 TB Turbinado sugar [or sugar in the raw]
1 TB J&D's Bacon Rub [or J&D's Bacon Salt or cayenne pepper and salt}

Preheat oven to 350.
Line a sheet pan with foil, top with a baking rack.
Mix sugar and spices on a large plate.
Pat each bacon strip into the sugar mixture, on each side. Really smush it on in there, get each strip coated completely.
Lay strips on the baking rack, bake 20-30 minutes until just crisp, but not burnt. Bacon will crisp more as it cools.
Remove bacon strips from rack as soon as they are cool enough to handle, or they will stick to rack as they harden.

Chop each piece of bacon by slicing long-ways into 3 thin strips, then short-ways to create lots of little squares, about 1/4" wide.

  • Make sure you have all your ingredients measured and laid out before you start the candy. When the sugar mixture comes to temperature, it needs to be finished very quickly, it will start to harden immediately after coming off the heat.


For the candy:

1 cup brown sugar [use leftovers from the candied bacon]
1 cup white sugar
1/2 cup water
1 stick unsalted butter [about 4oz or 1/2c]
1/3 cup light corn syrup
1 tsp J&D's Bacon Rub
1/2 tsp cayenne pepper

1/2 lb chopped, candied bacon [see above]
1/2 teaspoon baking soda

Line a small baking sheet with parchment.
In a large saucepan [be sure you use a large pan, it will double and triple as it boils], combine the sugar, water, butter and corn syrup and bring to a boil.
Cook over moderately high heat, stirring occasionally, until the caramel is light brown and registers 300° on a candy thermometer, 10 minutes.
Remove from the heat and carefully stir in the bacon and baking soda. The mixture will bubble.
Immediately scrape the brittle onto the baking sheet.
Using the back of a large spoon (oil it lightly if it sticks), spread the brittle into a thin, even layer.
Let cool completely, about 30 minutes. Break the brittle into large shards.


recipes altered from: About Food and Food and Wine


Friday, June 20, 2014

Smoked Sausage and Onion Stuffed Chicken Breast

Preheat your oven to 350 degrees F.


The Stuffing

1/2 an onion, chopped sauteed with a kielbasa smoked sausage piece about the size of your hand, chopped small. 
1 c bread crumbs
1/4 c Parmesan cheese
1 tsp Trader Joe's 21 seasoning (or other all-purpose mixed seasoning)
1/2 tsp (or about two quick shakes) cayenne pepper
1 tsp salt
1 tablespoon butter, melted
1/4 cup water


Sautee onion and sausage together in a medium/hot pan till onion is nicely browned and sausage has those crispy dark bits on the sides, about 5 minutes. 


In a small bowl, mix together onion mixture, bread crumbs, seasoning and melted butter. If necessary, add water, a little bit at a time, until mixture comes together enough that you can squeeze a ball in your hand. If it gets too 'goopy', add a little more bread crumbs and try again. 


The Rolls
2 whole chicken breasts or 4 halves
Pound chicken out thinly. You can use a mallet or a hammer. I like my heavy Chinese cleaver for the job. 

To assemble:
Lay a piece of thinly pounded chicken onto your cutting board. Grab a small handful of stuffing and squeeze it into a ball (or enough to make a ball that sits in the middle of your chicken, see picture below).
Roll firmly, from end to end (I tend to roll Right to Left, but it's not a science). Repeat until you've used up all your chicken.
Optionally, you can secure the rolls with a toothpick. But if you roll them tightly enough and handle gently, you really don't need them. 

The Breading
Now you're gonna need two bowls...

In one bowl:
1 cup panko
1 tsp (or a pinch) of salt

In the other bowl:
2 eggs, whisked together

This is where you multi-task. You don't want to bread your chicken until you're putting it right into the hot pan. This way, your breading doesn't get soggy. Also use one hand for Wet ingredients and one for Dry. That way you don't get HULK HANDS. If you don't know what I'm talking about it... you'll see for yourself if you do it wrong. 
So get your pan going, about medium/high heat. Pour in about a tablespoon of oil and I also like to put in a tablespoon of butter (yum).
Assembly line - with one hand, carefully place the chicken rolls into the egg and roll gently to cover.
With the other hand, roll the chicken into the panko until its completely covered.
Drop the chicken into the hot pan, Seam Side Down! This way, your seam will sear together and you don't have to worry about your rolls falling apart (See? Told you you don't need toothpicks). 
Repeat with each piece.


Cook them until the crust on the outside gets a nice brown color, about 5 minutes per side. You aren't fully cooking the chicken yet, just getting some color and sealing your seams.

Carefully scoop them out of your pan with a couple of forks or a spatula. Place them into an oven safe dish and bake about 25-30 minutes until chicken is cooked through. You can poke in a thermometer to see if they are about 165 degrees inside, OR, just slice into one - it should be totally white, with no pink. 

Take them out of the dish and place on a cutting board. Let rest/cool for 5-10 minutes, then slice them (diagonally, if you wanna be fancy). 

Serve with corn on the cobb and green beans, or what have you.


Tip: Bake your corn, still in its husk, on the oven rack while the chicken is cooking. They should both be done about the same time. To check corn, peel the husk back and squeeze one of the kernels, if its soft, its done, if its crunchy let it cook a bit longer.

Wednesday, May 28, 2014

Roasted Banana, Pineapple, and Brown Rice Muffins with Fresh Ginger Streusel

Well that's literally and figuratively a mouthful. These muffins are dense but soft, with a lovely chewiness from the rice, sweetness from the pineapple and a pop of spice from the ginger struesel.


Roasted Bananas:

3 or more Bananas
1 foil covered sheet pan

Heat oven to 375, F. Place bananas on foil covered pan (foil makes for easy cleanup!). Roast for 12-15 minutes until blackened all over and starting to bubble out juice. Let cool before handling.
Snip off the top with a pair of scissors and squeeze from the end like toothpaste.


For the Streusel:
1c flour
1/4c butter
2 TB freshly grated ginger
1 tsp cinnamon
1/2 tsp nutmeg

Mix everything together until the flour is all incorporated. It should look sandy and clumpy. Drop onto tops of muffins before baking, about 1 tablespoon per muffin.


For the Muffins:

1.5 c self-rising flour
3 TB Korean Alday nut tea mix (or 1/2 tsp salt)
3 Roasted Bananas
3/4 c white sugar
1 egg, beaten
1/3 c butter, melted
2 TB sour cream

Solid Garnish:
1 8oz can pineapple tidbits, drained
1/2 c brown rice (cooked)

Stir dry ingredients in a bowl. In a separate bowl, beat wet ingredients together. Stir dry into wet ingredients until combined. Fold in solid garnish. Fill muffins most of the way full. Top with struesel. 
Bake at 375, F, for 25-30 minutes, until tops are lightly browned.


Freezer Meals: Teriyaki Baked Chicken


Freezer cooking 101: Buy meat in bulk, portion into bags with marinades and freeze.

You can fit 3-4 chicken leg/thigh combos in 1 gallon size ziplock bag, depending on how big the chicken is (or how good you are at Tetris). Probably 4-6 chicken breasts, easily. Whatever you use, you can fit a lot into a gallon size bag. Pour over the marinade and freeze until ready to use.

/\ My freezer looks like this /\

Thaw in the 'fridge for about a day (if you use a lot of chicken, it may take longer to thaw). You can, in a pinch, use a microwave on defrost setting. Just be careful not to actually cook the chicken in the process!

To bake: Place chicken into foil lined pan (for easy cleanup! teriyaki tends to get sticky), dump marinade over top. Optionally pour over a can of pineapple.
Bake at 375 F, for about an hour, until chicken is done and skin is nicely brown and crispy.


You know chicken is done when it starts coming off the bone like this ->


Serve over brown or white rice, with a bit of kimchi or spicy pickle on the side.

Tips:
  • In the morning, dump everything into a slow cooker and set to low. Ready by dinner, in about 8 hours.
  • Serve with fried rice or chow mein.