I'm at the part in my culinary learning where, frankly, I think anyone can do a recipe. It's just a set of instructions wherein, if you follow them strictly, you get exactly what the recipe describes. Recipes are great!
But there comes a point where you can go beyond recipes, to simple technique. Technique is just know-how plus experience. It gives you the ability to just grab a bunch of ingredients and throw them together to make something delicious, without referencing anything. Kinda like your friend's Italian grandma who can magically pull all kinds of homemade stuff out of the air, just because she's been doing it for years. And her mother, and her mother's mother...
To me, that is the essence of a real chef - when you understand something so well that you can create a dish, with whatever is on hand, Iron Chef style.
Here is a neat new baking technique I recently came across whilst Stumbling.A famous French chef, Richard Bertinet, came up with an alternate dough-kneading method that is basically just throwing and slapping dough instead of kneading it with your hands to help develop the glueten and get the dough to the right texture for rising.
It's a lot of fun and a great stress reliever :)
This is ideal for wet, sticky, doughs like yeast rolls.
>>Here is a great video from the UK's Guardian of Bertinet himself teaching his technique.<<

Sunday, May 27, 2012
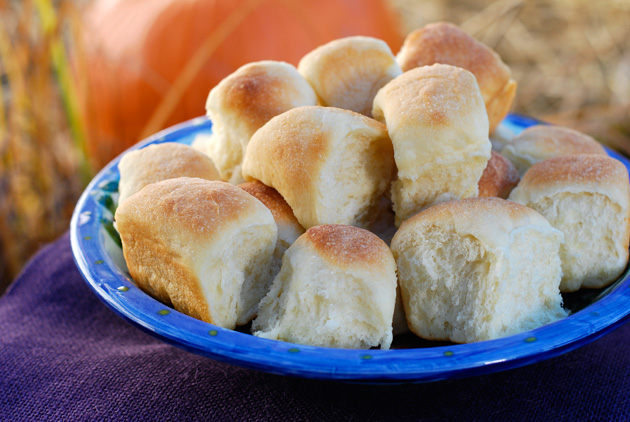
A Million Billion Fluffy Soft Buttery Dinner Rolls
Ok maybe not a Million Billion. That is a lot. This recipe makes 4 dozen rolls (48 rolls). The genius part of this is the method of baking them in one big pyrex pan so it makes a whole lot at once.
Perfect for a dinner party, Thanksgiving, or just having a bunch of delicious rolls around to make sandwiches with for weeks on less than a dime! You can also just bake as many as you want now (say 6-12 for dinner) and freeze the remaining dough balls. That way you can have lots of fresh delicious rolls for as long as they last (wont be long, mind you).
Lots of fun possibilities with this one.
I found this recipe whilst Stumbling with 'dinner rolls' entered into the search feature. Stumble is an awesome way to find neat new recipes!
Dinner Rolls
(with very slight alterations on my part, from the original post Aunt Marie's Dinner Rolls)
This recipe has a lot of steps, so be sure to check out the how-to Video from Woodfired Kitchen.
Using a stand mixer for this is best. Barring that, use a hand mixer. And barring that, assuming you have strong arms, use a whisk and spatula and knead the dough by hand about 10 minutes.
You will need:
4 ½ cups all-purpose flour, divided into two equal parts
1 cup half and half (ie. half cream, half milk)
1 stick (4 ounces) salted butter, divided
¼ cup sugar
1 ¼ teaspoons of salt
1 package of quick rise yeast (or 2 1/2 teaspoons)
1 cup warm water (100°)
About ½ cup additional flour for kneading
- Pour a cup of half and half into a sauce pan and heat for 2 or 3 minutes on medium until it’s hot and steamy. Do not boil! Remove from heat and add the sugar, 5 1/2 Tablespoons of the butter and salt. Let it sit a few minutes, the milk will cool while the butter melts. You don't want it to be too hot or the batter can kill the yeast right out.
- Pour the milk mixture into the mixing bowl and scrape the gooey sugar from the bottom of the pan. Add a cup of warm water, 2 ¼ cups of flour and sprinkle on the yeast. Attach the flat beater, and beat on medium speed for 3 or 4 minutes, until you have a smooth batter with no lumps. Scrape the bowl as necessary.
- Now add the other 2¼ cups flour, switch to the dough hook and beat for 5 minutes on medium low speed. Scrape bowl as necessary to get all the bits. The dough is ready for hand work once all the flour is fully incorporated and the dough is smooth and stretchy.
- Now comes the fun. Put a small amount of flour onto a work surface. Get all the dough off the dough hook, and scrape it in one lump out of the mixer bowl and onto the flour. Pull the edges of the dough in toward the center like an envelope, using the dough scraper at first and then your fingers as the dough gets less sticky. Continue this, constantly pulling and then pushing down on the center with your palms, adding a little flour as needed to prevent sticking. After a few minutes, you will feel the dough push back as the gluten develops. This is a good thing. Knead for a minimum of 5 minutes altogether, and then form a ball.
- Put the ball of dough into a large bowl (sprayed with baking Pam) and let rise, lightly covered, for 45 minutes in an 80° environment (ie. a warm cupboard or an oven with the light on).
- Coat the bottom and sides of the lasagna pan with 1 1/2 teaspoons of softened butter (or spray with baking Pam). Melt the other 2 Tablespoons of butter lightly and set aside.
- Spread the dough into a rough rectangle on a lightly floured surface and fold the rectangle in half. Spread out into a rough rectangle and fold in half again. Let the dough rest for 5 minutes and then spread it out into a rectangle the size of the lasagna pan. Put the dough into the lasagna pan, spread it out evenly, and pour the melted butter over the dough
- This is the genius part: Using the dough scraper, cut the dough into 48 small squares inside the pan. To do this, make 5 parallel cuts lengthwise and 7 crosswise in a grid. Picking up each of the small squares of dough in turn, stretch the top skin across and down, tucking it roughly under to make a small ball of dough. Put each piece back where it came from. No need to strive for perfection here: to do this to all the rolls should only take three or four minutes!
- Let the rolls rise for 30 – 40 minutes at 80°, until at least doubled in size. Preheat the oven to 350° when the rolls are nearly risen.
- Bake for 20 minutes at 350°. Dinner Rolls are ready when they’re light brown on the top. Cool for an hour on a rack – that is, if you can wait that long to try them… I know I never can!
Subscribe to:
Posts (Atom)