Search This Blog

Saturday, December 3, 2016

Orange Curry

Orange Curry
serves 4-6

1 cornish hen - cut into 8 peices
4 skinless chicken thighs - cut in 1/2
2 small or 1 large sweet potato, chopped
1 shallot or 1/2 onion, chopped
2 small or 1 large carrot, chopped
1/2 head cauliflower, chopped
6 cloves garlic, chopped

1 T curry powder (I use S&B)
1 T tomato paste
1 5.6 oz can coconut milk
2 t salt
zest and juice of 1 orange

1/2 gal water

In a pot big enough to hold about a gallon of liquid, heat over medium flame. Add curry powder and dry toast for about a minute, stirring often. Add in tomato paste and orange zest. Toast, stirring constantly, for another minute. Burns quickly, keep an eye on it!
Add chicken, garlic and onion, and coat with spice mixture, stirring constantly for 1-2 minutes.
Pour water and orange juice over chicken to cover. Bring to boil, then turn the heat down to simmer on low for about 30 minutes until chicken is tender.
Add in veg and cook another 10-15m until veg are tender.
Turn off heat, stir in coconut milk, season with salt to taste.

Add a little cayenne or fresh chilis or jalapeno if you'd like it spicy, depending on the spiciness of your curry powder or garam masala mix.


Serve with rice or garlic naan


Thursday, October 27, 2016

Semi-Homemade Trader Joes Dinner

Promise I'm not being sponsored by anyone. This is how I eat and how I cook.
Got the chance to go to Trader Joe's the other day, which, I always take if I can since I live a good hour or so from the nearest one. That place always inspires me, and its typically pretty inexpensive.
I don't cook with recipes and I don't have a lot of time today, so todays' post is going to be train-of-thought, the way I do it when I actually cook. Leave a note if you'd like a proper recipe or have any questions, and Ill key one in later.

You'll need:
Precut butternut squash
Premade three cheese ravioli
chicken-and-apple sausage
leeks
garlic
vegetable oil
butter
salt to taste


Heat your handy-dandy nonstick saute pan over medium heat. Add in a teaspoon or so of vegetable oil. When it's hot, lines will form in it when its tipped (also when you add things in, it goes 'ssssss!').
Add in a handful of chopped leeks, garlic, and couple of sliced chicken-and-apple sausages. Saute until browned, stirring every few minutes with your (handy-dandy) silicone covered tongs (wins my best tool EVER! award). Remove from pan.
Put pan back on heat and toss in a small chunk of butter. Add in your TJ's pre-made ravioli and the chopped butternut squash. Splash in a little water. Cover and let steam until squash is soft (5 minutes ish). If water runs out before the squash is soft enough, add in a little more and deglaze (gently lift ravioli from bottom of pan if they get stuck).
Add sausage mixture back in and toss to coat.
Serve ona paper plate. Be sure and take a picture before you eat.
...But don't be a perfectionist, your food is getting cold!


*Tip: If you want to get real fancy - do a brown butter and cream sauce with a little sage or thyme. 
Brown butter= cook butter until its browned but not burnt. Add in herbs, splash of cream, pinch of salt.


Wednesday, October 26, 2016

Crispy beef with garlic

Another easy boat meal. My current kitchen setup on the boat is:
one butane portable camp stove
one large pot with lid
one small pot with lid
one nonstick saute pan with lid

Possibilities=endless. I actually have a lot of kitchen equipment, considering I live in a tiny space. I also own a small electric griddle and a small toaster oven as well. However, one could easily get by with just a small pot or saute pan.

Crispy Beef with Garlic
serves 2

1/4 # ribeye, cubed
1/2 onion, sliced
1 cup chopped pickled veg (See below)
1/4 c sliced mushrooms
4-6 garlic cloves, sliced thinly
1 TB brown sugar
2 TB soy sauce

1/4 c Cornstarch
ziplock baggie
1/2 t Salt
2-3 TB vegetable oil

1. Place cubed steak into ziplock baggie (or a lidded container, whathaveyou), add in cornstarch and salt. Seal and shake to coat meat with starch mixture.
2. Heat a saute pan over medium heat. Add oil. When oil runs in lines when pan is tipped, its hot enough (also it goes 'sssst!' when you add the meat). Shake excess starch off of meat and add to oil. Cook until browned and crispy on all sides, about 5-8 minutes. Remove from pan.
3. Add in all vegetables to pan. Saute for 5-8 minutes. If using harder vegetables such as carrots or broccoli stems, add in about 2 TB of water and cover to steam for 3-4 minutes to soften. 
4. There should be a little liquid left in the pan (if not add a little splash of water). Toss in the brown sugar and stir a few minutes till the sugar melts, then stir in the soy sauce. If sauce is too watery, let it cook down another 3-5 minutes until it gets the consistency youd like.
5. Add the beef back in and stir to coat with sauce.

*optional: Serve with rice or noodles

Pickled Veg
In a glass jar with a tight fittind lid... --> this is mine
1. Stuff in as many veggies as you can. 
2. Pour over a solution of 2:1 vinegar to water, plus salt to taste.
For example: 1 cup vinegar, 1/2 c water, 1 teaspoon salt.
***Secret ingredient! Add in a splash of kombucha.
3. Seal with lid and refrigerate about 3 days. 
EAT!

I use whatever veg I have on hand or is cheap at the store. Some I have used include a mixture of: broccoli (stems are vegetables too! chop them up), carrots, cucumber, cauliflower, onion, cabbage, radish, sweet potato (yep! let it sit a few days longer), beets (it will turn everything pink. everything!).

The great thing about these pickled veg is... not only are they incredibly easy and cheap but they're super healthy for you. Active cultures from the kombucha go to work immediately, making these taste great and do wonders for your body. Even if you can't find kombucha, no worries, vinegar is good for you too!
Reuse the pickling solution over and over and it will develop its own excellent flavor and health properties.

Tuesday, May 24, 2016

Gorgeous, Soft Muffins

You know the drill. Thoughts in your head of almost cupcake-like muffins, sweet and soft and fluffy... only to bake up heavy, dense hockey pucks. Can't-even-gulp-them-down-with-a-glass-of-milk... amiright? Nobody likes that.

One way to soften up your muffins and cakes alike and give them nice leavening (think fluff!), is to add in whipped cream. Fluffyness and flavor in one. I learned this method from Shirley O Corriher's infamous book, Bakewise, and the below recipe is based on her's. Great book, lots of nice techniques and a neat explanation of science.
Sure you can use egg whites, whipped to medium peaks and fold in. This works. But the texture is a bit more stiff (think meringue) and it has a decidedly egg-y flavor. Whipped cream is where it's at. It's an easy extra step that you can even do up to a day or so in advance (whipped cream will keep in a cold refrigerator for a day or so).

Tip: Give it a hot flash: With most quick-breads, including biscuits and muffins, I highly suggest preheating the oven to 25-50 degrees hotter than you'll actually bake with. This ensures a really hot oven when your beautiful pastry goes in, giving it an important initial lift, helping them to rise UP instead of OUT from the very beginning.

Ingredients

2 c flour
2 t baking powder
1/2 t salt
1 c sugar
1 egg
1/3 c oil
1/3 c buttermilk
1 t vanilla extract
2 ripe bananas, mashed
1/2 c heavy cream

sanding sugar for topping, optional

Preheat your oven to 425 degrees F. Prepare a muffin tin for baking (spray, flour, liners, whathaveyou).

1. Mix dry ingredients: flour, baking powder, salt, sugar, in one bowl.
2. Mix wet ingredients: egg, oil, buttermilk, vanilla, and bananas in another bowl.
3. In a third bowl, whip cream to medium peaks.
4.  Beat together wet and dry ingredients with a hand or stand mixer.
5. With a spatula, fold in 1/3 of the whipped cream to the other mixture until most of the white streaks are gone and its mostly incorporated.
6. Fold remaining whipped cream into batter until, again, most of the white streaks are gone and batter is a pretty uniform color.
7. Spoon into muffin cups, all the way to the top. Ideally, use an ice cream scoop, but a regular spoon works too. Optionally, sprinkle sanding sugar on top.
8. Lower oven temperature to 400 degrees F. Bake about 20 minutes, until cake tester inserted comes out clean.


Thursday, May 12, 2016

Bread in 5: Garden Focaccia

For the Focaccia:

Pull a melon-size (1 1/2- 2#) piece of 
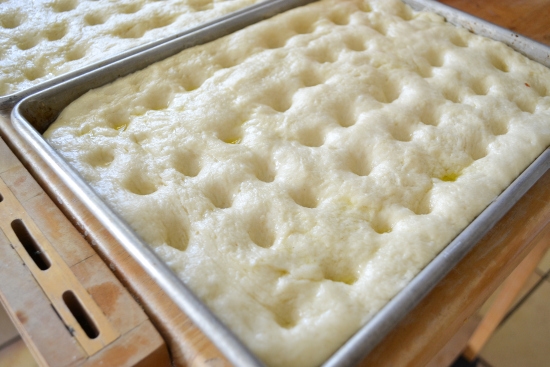
dough from your stash. Shape into a pizza pan, let rest to room temperature, about 1 hour.

Make Ninja Claw hands 
and poke holes in the focaccia with the tips of your fingers.

Like so. Drizzle on Olive Oil and spread on Pesto.
Bake Focaccia about halfway, 10-15m, remove from oven and add toppings. 
Bake another 15m. 

Optionally, but highly suggested - turn on the broiler and (watch carefully!) toast the toppings for another 5-8m until you get a nice golden brown here and there, but not burnt (watch carefully!). This will add crisp to the edges of your toppings and a bit of toasty flavor. Yum!

Toppings:

Top with fresh ingredients from your garden (or your friend's garden, shh!). 

Here, I used pesto, blanched fresh green beans, shaved potato, cream cheese and pickled red onion.


Pesto:


Okay Pesto is one of those things that's incredibly complicated and time consuming to make...  Is what I would say if it wasn't incredibly simple and quick!
And with a food processor, you can make delicious fresh pesto in seconds. 

Go with a ratio on this one, that way you can be creative with your ingredients:

The basic ratio is 1:2:2:8 
(1 part nuts, 2 parts oil, 2 parts grated cheese, 8 parts leaves or herbs)

For example:
3 or 4 Tablespoons nuts
1/4 c oil
1/4 c grated cheese
2 cups herbs

To this mixture, I'd add in 2-3 cloves of garlic, 1 Tablespoon lemon juice and two or three pinches of salt, to taste. 
Pulse up everything in your food processor. Taste. Add extra salt or lemon juice and taste again if needed. 

Traditional pesto includes: basil, olive oil, salt and pine nuts
But you can use any combination of greens and herbs, oils and nuts. I tend to use whatever I have on hand. 
I've made lovely pesto with unsual ingredients such as:
>Mint and Radish Greens, Olive Oil and Pistachios.
>Rosemary, Walnuts, Pecorino and Olive Oil.
>Dandelion Greens, Basil, Parmesean and toasted Pecans

I encourage you to try different things until you find a fun combination that you really like. 

Weird tip: If you find your pesto is too thick, but already has a lot of oil in it, add in one or two ice cubes and pulse with food processor.

If you make focaccia and stop with just olive oil and pesto toppings, you're good. 
But here are a few more topping suggestions:

Shaved Potato:

Slice on a Mandolin for best results. 

You want your slices to be super thin, almost transparent. Soak the slices in a bowl of cold water for about an hour. This will remove excess starch, which will help them bake up nice and crisp.
Note this is also how you make great fries.

Pickled Red Onion:


2 Parts Vinegar
1 Part Water
plus sugar and salt to taste
Heat ingredients in a pot or microwave safe bowl, just enough to dissolve the sugar. 

Optional add ins: Jalapenoes, peppercorns, lime slices

Fill up a glass jar with shaved red onions (cut them thinly on a mandoline). Top with vinegar mixture. Secure lid and refrigerate for 1 hour, up to 24 hours before eating. Will keep for about a month before it gets super onion-y tasting.

Tip: PICKLE ALL THE THINGS. This basic pickling ratio is good for basically any kind of pickle. A real Southern treat is pickled cucumber and pearl onions, often served as a side dish in Southern American cuisine.