Search This Blog

Monday, December 31, 2012

French Croissants


 Got a chance to visit France whilst on deployment with the Navy, and O-M-G there is a reason why France is the pastry capital of the world!! The first real pastry I had there was the croissant, a flaky, fluffy, buttery roll named after its crescent shape. BEST FOOD EVAR! One could easily live off these things (Who said man cannot live on bread alone? That's just silly.).

I had a few other yummy treats in France, but these babies are definitely on the top of my list of delicious pastries.  They are a bit labor intensive, but if you are a kitchen-holic like me, its not a problem to do a little work on them every day for two or three days.
They can be customized a lot of ways, too - add jam or chunks of chocolate in the middle, then roll up, for a sweet treat. Also I'm sure most of you have heard of 'pigs in a blanket', which is probably a white American thing - usually a hotdog wrapped in croissant dough, with cheese or whatever. For a savory snack, you could totally do these fancy-schmancy with some fancy sausage and hard to pronounce cheese, or something like that. Or... y'know... hot dog and American cheese. Whatever floats yours.
It sure beats the hell out of out-of-the-can Pillsbury type, lemme tell ya. Though the process may be intimidating for those who only dabble in pastry, PLEASE TRY THESE because you wont regret it.

Recipe and pictures for steps copied from Daily Delicious blog

Ingredients:
1¼ teaspoon of dry-active yeast (about ½ sachet)
3 tablespoons warm water
1 teaspoon sugar
1 3/4 cups of bread flour
2 teaspoons sugar
1½ teaspoon salt
½ cup  milk 
2 tablespoons canola oil (or other tasteless oil)
½ cup (1 stick) chilled, unsalted butter
1 egg, for egg wash


1. Mix the yeast, warm water, and first teaspoon of sugar in a small bowl. Leave aside for the yeast and sugar to dissolve and the yeast to foam up a little.
2. Measure out the other ingredients
3. Heat the milk until tepid (either in the microwave or a saucepan), and dissolve in the salt and remaining sugar
4. Place the flour in a large bowl.
5. Add the oil, yeast mixture, and milk mixture to the flour
6. Mix all the ingredients together using the rubber spatula, just until all the flour is incorporated
7. Turn the dough out onto a floured surface, and let it rest a minute while you wash out the bowl
8. Knead the dough eight to ten times only. The best way is as Julia Child does it in the video . It’s a little difficult to explain, but essentially involves smacking the dough on the counter (lots of fun if you are mad at someone) and removing it from the counter using the pastry scraper.


9. Place the dough back in the bowl, and place the bowl in the plastic bag.
10. Leave the bowl at approximately 75°F/24°C for three hours, or until the dough has tripled in size.


11. After the dough has tripled in size, remove it gently from the bowl, pulling it away from the sides of the bowl with your fingertips. 
12. Place the dough on a lightly floured board or countertop, and use your hands to press it out into a rectangle about 8 by 12 inches (20cm by 30cm).
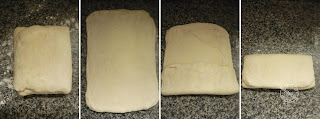
13. Fold the dough rectangle in three, like a letter (fold the top third down, and then the bottom third up)


14. Place the dough letter back in the bowl, and the bowl back in the plastic bag. 
15. Leave the dough to rise for another 1.5 hours, or until it has doubled in size. This second rise can be done overnight in the fridge.
16. Place the double-risen dough onto a plate and cover tightly with plastic wrap. Place the plate in the fridge while you prepare the butter. 


17. Once the dough has doubled, it’s time to incorporate the butter
18. Place the block of chilled butter on a chopping board.
19. Using the rolling pin, beat the butter down a little, till it is quite flat.
20. Use the heel of your hand to continue to spread the butter until it is smooth. You want the butter to stay cool, but spread easily.
21. Remove the dough from the fridge and place it on a lightly floured board or counter. Let it rest for a minute or two.
22. Spread the dough using your hands into a rectangle about 14 by 8 inches (35 cm by 20 cm). 
23. Remove the butter from the board, and place it on the top half of the dough rectangle 
24. Spread the butter all across the top two-thirds of the dough rectangle, but keep it ¼ inch (6 mm) across from all the edges.
25. Fold the top third of the dough down, and the bottom third of the dough up.
26. Turn the dough package 90 degrees, so that the top flap is to your right (like a book). 
27. Roll out the dough package (gently, so you don’t push the butter out of the dough) until it is again about 14 by 8 inches (35 cm by 20 cm). 
28. Again, fold the top third down and the bottom third up. 
29. Wrap the dough package in plastic wrap, and place it in the fridge for 2 hours. 


30. After two hours have passed, take the dough out of the fridge and place it again on the lightly floured board or counter.
31. Tap the dough with the rolling pin, to deflate it a little
32. Let the dough rest for 8 to 10 minutes
33. Roll the dough package out till it is 14 by 8 inches (35 cm by 20 cm).
34. Fold in three, as before


35. Turn 90 degrees, and roll out again to 14 by 8 inches (35 cm by 20 cm).
36. Fold in three for the last time, wrap in plastic, and return the dough package to the fridge for two more hours (or overnight, with something heavy on top to stop it from rising)

37. Roll the dough in to 5mm thick. Cut into 9x22 cm triangle.

38. Starting at the wide end, roll the triangle up towards the point, and curve into a crescent shape.
39. Place the unbaked croissant on the baking sheet
40. Repeat the process with the remaining dough, creating 12 croissants in total (if you make the same size as me it will be less).

41. Leave the tray of croissants, covered lightly with plastic wrap, to rise for 1 hour
42. Preheat the oven to very hot 475°F/240°C/gas mark 9.
43. Mix the egg with a teaspoon of water
44. Spread the egg wash across the tops of the croissants. 
45. Put the croissants in the oven for 12 to 15 minutes, until the tops are browned nicely
46. Take the croissants out of the oven, and place them on a rack to cool for 10 minutes before serving.


This post was sponsored by Anti-Flag and lots of love.

Sunday, August 5, 2012

Ginger Tea for Preggies


ginger tea

One of the most common side effects of pregnancy is... SICK!!! Right? Its awful. Men are so lucky they never have to go through this. A bit resentful, perhaps? Yes. Well. 
One of the greatest preggy-sick medicines that has been used by our great great great ancestors in times past is Ginger. Ginger is the root of some kind of plant or other, it looks funny, all knobbly and brownish and smells sharply of ginger.
I'm sure there's some kinda neat scientific explanation, but, in short, Ginger helps to cure nausea... makes ya feel better. Plus, its extremely inexpensive and ridiculously easy to make. You can generally find it in any super market next to the weirder roots and veggies.
Note that you can also use this same tea for any kind of nausea or upset stomach such as indigestion or motion sickness. Ginger is a great cure-all. And its really tasy!
Not everyone likes the taste of ginger so feel free to add other citrus fruits like oranges, pineapple, lemon, etc., as pictured below I added half and orange with the peel. I think the peel is really citrus-y and goes well with the sharpness of ginger. And its kind of fancy.
 
with orange peel
Recipe:
1-2" peice of ginger root 
4 cups water
1/4 cup sugar or honey (optional)
1/2 an orange or other fruit with peel  (optional)
Instructions: Throw everything into a pot and simmer for 20-30 minutes.  Strain out peel or other chunks. Chill and serve with ice, or drink warm. 

Alternative Methods: 
Use a microwave if you dont have a stove handy
Steep in some really hot water, for about 10 minutes or so
Pour water into a large container, add ginger plus other ingredients, refrigerate 24 hours

ginger root


Sunday, May 27, 2012

The Bertinet Method

I'm at the part in my culinary learning where, frankly, I think anyone can do a recipe. It's just a set of instructions wherein, if you follow them strictly, you get exactly what the recipe describes. Recipes are great!
But there comes a point where you can go beyond recipes, to simple technique. Technique is just know-how plus experience. It gives you the ability to just grab a bunch of ingredients and throw them together to make something delicious, without referencing anything. Kinda like your friend's Italian grandma who can magically pull all kinds of homemade stuff out of the air, just because she's been doing it for years. And her mother, and her mother's mother...
To me, that is the essence of a real chef - when you understand something so well that you can create a dish, with whatever is on hand, Iron Chef style.

Here is a neat new baking technique I recently came across whilst Stumbling.A famous French chef, Richard Bertinet, came up with an alternate dough-kneading method that is basically just throwing and slapping dough instead of kneading it with your hands to help develop the glueten and get the dough to the right texture for rising.
It's a lot of fun and a great stress reliever :)
 This is ideal for wet, sticky, doughs like yeast rolls.

>>Here is a great video from the UK's Guardian of Bertinet himself teaching his technique.<<

A Million Billion Fluffy Soft Buttery Dinner Rolls

Ok maybe not a Million Billion. That is a lot. This recipe makes 4 dozen rolls (48 rolls). The genius part of this is the method of baking them in one big pyrex pan so it makes a whole lot at once.

Perfect for a dinner party, Thanksgiving, or just having a bunch of delicious rolls around to make sandwiches with for weeks on less than a dime! You can also just bake as many as you want now (say 6-12 for dinner) and freeze the remaining dough balls. That way you can have lots of fresh delicious rolls for as long as they last (wont be long, mind you).
Lots of fun possibilities with this one.
I found this recipe whilst Stumbling with 'dinner rolls' entered into the search feature. Stumble is an awesome way to find neat new recipes!


Dinner Rolls
(with very slight alterations on my part, from the original post Aunt Marie's Dinner Rolls)
This recipe has a lot of steps, so be sure to check out the how-to Video from Woodfired Kitchen.

Using a stand mixer for this is best. Barring that, use a hand mixer. And barring that, assuming you have strong arms, use a whisk and spatula and knead the dough by hand about 10 minutes.

You will need:
4 ½ cups all-purpose flour, divided into two equal parts
1 cup half and half (ie. half cream, half milk)
1 stick (4 ounces) salted butter, divided
¼ cup sugar
1 ¼ teaspoons of salt
1 package of quick rise yeast (or 2 1/2 teaspoons)
1 cup warm water (100°)
About ½ cup additional flour for kneading

  1. Pour a cup of half and half into a sauce pan and heat for 2 or 3 minutes on medium until it’s hot and steamy. Do not boil! Remove from heat and add the sugar, 5 1/2 Tablespoons of the butter and salt. Let it sit a few minutes, the milk will cool while the butter melts. You don't want it to be too hot or the batter can kill the yeast right out.
  2. Pour the milk mixture into the mixing bowl and scrape the gooey sugar from the bottom of the pan. Add a cup of warm water, 2 ¼ cups of flour and sprinkle on the yeast. Attach the flat beater, and beat on medium speed for 3 or 4 minutes, until you have a smooth batter with no lumps. Scrape the bowl as necessary.
  3. Now add the other 2¼ cups flour, switch to the dough hook and beat for 5 minutes on medium low speed. Scrape bowl as necessary to get all the bits. The dough is ready for hand work once all the flour is fully incorporated and the dough is smooth and stretchy.
  4. Now comes the fun. Put a small amount of flour onto a work surface. Get all the dough off the dough hook, and scrape it in one lump out of the mixer bowl and onto the flour.  Pull the edges of the dough in toward the center like an envelope, using the dough scraper at first and then your fingers as the dough gets less sticky. Continue this, constantly pulling and then pushing down on the center with your palms, adding a little flour as needed to prevent sticking. After a few minutes, you will feel the dough push back as the gluten develops. This is a good thing. Knead for a minimum of 5 minutes altogether, and then form a ball.
  5. Put the ball of dough into a large bowl (sprayed with baking Pam) and let rise, lightly covered, for 45 minutes in an 80° environment (ie. a warm cupboard or an oven with the light on).
  6. Coat the bottom and sides of the lasagna pan with 1 1/2 teaspoons of softened butter (or spray with baking Pam). Melt the other 2 Tablespoons of butter lightly and set aside.
  7. Spread the dough into a rough rectangle on a lightly floured surface and fold the rectangle in half. Spread out into a rough rectangle and fold in half again. Let the dough rest for 5 minutes and then spread it out into a rectangle the size of the lasagna pan. Put the dough into the lasagna pan, spread it out evenly, and pour the melted butter over the dough
  8. This is the genius part: Using the dough scraper, cut the dough into 48 small squares inside the pan. To do this, make 5 parallel cuts lengthwise and 7 crosswise in a grid. Picking up each of the small squares of dough in turn, stretch the top skin across and down, tucking it roughly under to make a small ball of dough. Put each piece back where it came from. No need to strive for perfection here: to do this to all the rolls should only take three or four minutes! 
  9. Let the rolls rise for 30 – 40 minutes at 80°, until at least doubled in size. Preheat the oven to 350° when the rolls are nearly risen.
  10. Bake for 20 minutes at 350°. Dinner Rolls are ready when they’re light brown on the top. Cool for an hour on a rack – that is, if you can wait that long to try them… I know I never can!

Tuesday, April 10, 2012

Donna's Famous Sicilian Sausage and Meatballs

My friend's mom, Donna, is very much Sicilian. She cooked for us one day and I nearly died of good food. For the record, you can definitely die of good food, I almost did. Saw the white lights and all.
This recipe is sooooooooooo easy and only really takes a few ingredients. Does take some time to cook though, so be prepared (or go easy with a slow-cooker, all day).
You can add different things to this like cream or wine to the sauce, roasted garlic, onions, etc.
But I prefer it exactly the way she made it; simple.

1 16oz can of crushed tomatoes
2 8oz cans of tomato sauce
1 package good italian sausage
1 dozen meatballs (recipe below)

In a stock pot (or a slow cooker) combine all the ingredients and cook on low all day (6-8 hours)
Serve over pasta, with garlic bread and several glasses of good red wine.


Meatballs:
1 lb ground beef
1 cup breadcrumbs
1 egg

Knead crumbs and egg into meat until combined, without any dry or eggy spots. Form into about a dozen small meatballs (or however big you want them, till you've used the meat up). Do this firmly, really squish them together, this is going to cook all day and you don't want them to fall apart.

Friday, March 9, 2012

Bourbon chicken - Like at the mall

My fiance loves the Burbon Chicken at the mall, you know the stuff you get at those Chinese or Cajun type places. And this evening, when we were trying to decide what to do for dinner, he gave me the big ol' puppy dog eyes and casually  mentioned "You can cook anything, right?"
So. Challenge Accepted.
Anyway it gave me an excuse to go to the liquor store :) :)

I found this fantastic recipe via Google search on Dishin and Dishes, and I must say the flavor is fairly exact. Maybe even (dare I say) a little better, being fresh and home made.

Letting it sit overnight, as instructed, is a noble and wonderful thing to do. If you just don't have time though, at least try and let it sit for an hour or two. The longer it sits, the more the flavors meld into deliciousness. And if you absolutely must have this on the table in an hour or less... just go ahead and bake it, it's still a wonderful sauce!

INGREDIENTS:
½ c. soy sauce
½ c. brown sugar
3 garlic cloves
1 T. freshly grated ginger
½ c. chopped shallot or onion
8 boneless skinless chicken thighs, cut into small cubes
½ c. Bourbon Whiskey
1 T. rice wine vinegar
1 t. red chili flakes

DIRECTIONS:
In a small saucepan over medium heat, combine soy sauce, brown sugar, garlic, ginger, onion,bourbon, vinegar, and chili flakes; stir jjust until sugar has dissolved, about 2-3 minutes. Pour over chicken in a 9 x 13 baking dish and stir to coat. Cover and refrigerate for several hours or overnight.

Bake in a preheated 350°F. oven for 1 hour, basting every 20 minutes with pan juices. Serve immediately with pan juices over cooked rice.

Sunday, February 26, 2012

Panang Fish Curry

Even if youre not a big fan of curry, you might like this. This is a sweet yet savory Thai coconut curry with only a mild hint of spiciness.
This is quick to make too because you can easily multitask the three steps at the same time and throw it all together in about 15-20 minutes.
Some of these measurements are approximate since i don't really measure this stuff exactly.

Serves two

1 tablespoon thai red curry paste
1 can coconut milk
1 teaspoon cumin
1 teaspoon fresh or dried basil
1 tablespoon white or brown sugar
4 pieces boneless white fish fillets (such as tilapia)
4 red potatoes, chopped or cubed
2 tablespoons salt
3-4 tablespoons butter

1. Cook the potatoes: boil water in large pot (filled about halfway with water) add salt and potatoes. Cook until tender, enough where you can squish one with your fingers but not so soft they fall apart. Drain.

When fish is cooked, you can use the same pan to fry up the potatoes - on medium high heat, add a tablespoon of butter and toss potatoes in skillet. Cook 5-6 minutes, flipping when necessary to brown on at least two sides. This extra step adds yummy crunchy caramelization to the potatoes. You could omit this if you prefer.

2. Cook the fish: heat a large nonstick pan on medium high. Melt in about two tablespoons of butter, add in fish. Cook fish about 5 minutes on each side, turning carefully with a wide spatula, until cooked through and browned on both sides.

3. Make sauce: while fish and potatoes are cooking, heat the coconut milk in a saucepan on medium; when hot whisk in the curry paste, basil, cumin and sugar.

To assemble: in a bowl or deep plate pile on the potatoes, then half the fish, then pour sauce over. Repeat to make two meals.

Double or triple (or more) this recipe to serve as many people as you'd like.

Tuesday, February 21, 2012

Hells Yes Mocha Muffins

Aka - What to do with leftover Christmas chocolate and Starbucks Instant Coffee You Don't Really Like...
Duh. Mocha Muffins, Biatches!
Who can say 'no' to chocolate and coffee? (If you can, stop that!)
This is my own evil rendition of Berry Cream Muffins from Taste of Home's Baking Book. Sour cream is added for delicious texture and a tiny tangy kick. Along with my leftover Christmas chocolate and Starbucks instant iced coffee packets... these muffins are SEXY.

Makes about 2 1/2 dozen muffins
Ingredients:
4 cups all purpose flour
2 cups sugar
1 teaspoon baking powder
1 teaspoon baking soda
1 teaspoon salt
2 cups chopped chocolate bits
2 packets of Starbucks instant iced coffee (or other instant coffee about 1/4 cup)
4 eggs (lightly beaten)
2 cups sour cream (16 oz)
1 cup vegetable oil
1 teaspoon vanilla extract


Directions:
1. In a large bowl, combine flour, sugar, baking powder, baking soda and salt. Add chocolate and coffee powder, toss gently.  In another bowl, combine eggs, sour cream, oil and vanilla; mix well.Stir into dry ingredients just until moistened.
2. Fill greased or paper-lined muffin cups two-thirds full. Bake at 400 for 20-25 minutes or unil you can stick in a toothpick and it comes out clean.

Friday, January 20, 2012

Biscuits Redoux (a.k.a. Way the F@#$ Better Biscuits)

Kayso, our last Biscuit encounter was an exploration into the world of How to Do It Wrong.
Don't get me wrong, they were delicious; and I learned a few very useful techniques. But the texture was all wrong. I can open up a can o' biscuits from the store and get great texture, but creating that on my own is difficult because, honestly those guys cheat. They use big machines and fancy equipment to make their biscuits. I think a great chef should be able to do this without all the shenanigans. Like some ancient Samurai, who kills people with but a graceful sweep of his sword... >.> Something like that.

I consulted Nick Malgieri's 'How to Bake' for this next experiment, using the Buttermilk Biscuits recipe. I also used Bakewise's technique of handling the dough gently. And I folded some butter into the dough to make some nice layers (even Ogres have layers). These turned out extremely tender and delicious. Taste-wise, they were a little flour tasting, which is not bad, but I firmly believe that if I used heavy cream instead of Buttermilk, and added in a tablespoon or two of sugar, they'd have the perfect taste and texture for a sweet, breakfast biscuit.
As is, they would be wonderful rolled into balls and crammed together to bake as quick rolls. Brush a little garlic butter on top... mm.


2 cups all-purpose flour
2 teaspoons baking powder
1/4 teaspoon salt
6 tablespoons cold unsalted butter, cut into about 1"slices
plus more for spreading
3/4 to 1 cup buttermilk

Preheat oven to 500 degrees F.
Combine dry ingredients, stir with a fork or your fingers to mix.
Rub butter into dry mix (or pulse in food processor) until mixture resembles fine meal and there are no big butter lumps left.
Add buttermilk and stir in with a fork.
Turn dough onto a lightly floured surface and turn it over on itself (lightly knead) until its less sticky and more dough-like. Gently pat flat, about 1" thickness. Spread butter over dough. Fold over itself a few times (do not knead, just fold), this creates buttery layers! Pat flat again into 1" thickness.
Cut with a biscuit cutter or a glass into rounds and place them on a prepared pan. Press any scraps together and pat again to 1" thickness, cut. Discard any remaining scraps (or roll 'em into a ball and make mickey mouse biscuits!!)
Bake 10-12 minutes until well risen and lightly browned.

Monday, January 16, 2012

Cheesy Potato Scones ala Martha

 These Scottish "scones" are traditionally cooked on the griddle and served hot with other breakfast items. Fried in butter, these are crispy on the outside but inside are soft with a texture of mashed potatoes. I got this recipe out of Martha Stewart's Living magazine (Feb 2012 edition). The only thing I really did differently was to use Parmesan cheese instead of the fancy hard-to-pronounce cheese she lists in her magazine and I used Red potatoes instead of Russet. Use whatever cheese you have. I think that rustic recipes should include any sort of thing you have lying around if it looks like it would work with it, as that is really the essence of any rustic recipe.

Potato Scones
4 Red potatoes, skins on (or two large Russet)
coarse salt and freshly ground black pepper
1 stick of butter
1 cup all-purpose flour, plus more for rolling
1/2 teaspoon baking powder
1/3 cup or so shredded cheese (Parmesean, Jack, Cheddar, or whatever fancy cheese you have lying around)

Wash potatoes well and put on a plate in the microwave (covered with a paper towel), microwave 15 minutes until soft (or boil in salted water until soft). If using Russet potatoes, I'd take the peel off at this point (or peel before boiling). Red potato peels taste good though.
Place 3/4 stick of butter (about 6 tablespoons) into a bowl, add hot potatoes and blend with hand mixer until well blended and skins are torn into little pieces.
In a small bowl, whisk together flour, baking powder, 1 teaspoon salt, 1/4 teaspoon pepper. Stir into potato mixture with a spoon, until just combined. With your hands, knead in bowl to form a dough ball (a minute or two), cover and let rest about 20 minutes.
Dust work surface and rolling pin with flour. Roll out dough into an 8x10ish rectangle, sprinkle on cheese, fold in half and roll out again into a rectangle. Cut into squares and pan fry in butter (at about medium heat) 3-4 minutes per side until browned and cheese is melted.

Saturday, January 14, 2012

I Heart Food - A Food Rant

This morning I opened up a can of biscuit (whoop ass) and had those babies for breakfast, spread with creamy butter and a tart French marmalade. The biscuits were store bought. And I am a food snob. But I must admit, Pillsbury really knows how to build a biscuit makin' machine. Mouthful after mouthful of greasy, soft-yet-flaky biscuit, I wonder how they do that.
My favorite thing in the world is cooking. Food is like God, food is like porn. Food gives me a reason to live – literally and figuratively. I think I identify myself with Food. A strange thing to identify yourself with, you might think, but the truth is, there is no better faith.
Food is like rock and roll. Its art. Its music. It gets you going. It gives you a glimpse into a fantasy world, where everything is good and fine and perfect. It puts you in another place.
Have you ever had a pasta so good, it made you wonder if you felt what they felt in the old days, when people cooked over a real fire and harvested each grain of wheat by hand and ground it under real stone? No? You're missing out.
You eat two to three times a day, or more: breakfast, brunch, lunch, tea, dinner, snacks; the list goes on And that is a normal day. Think of holidays, birthdays, celebrations of all kinds. There's always food, whether its some special cakes, cookies, pies or appetizers or snacks or a huge elaborate banquet. Food is an integral part of our lives, one that is taken as much for granted as using the toilet. You just do it, every day, without really thinking about it.
That is the problem with this country. Nobody cooks anymore. People think the problem lies in politics or the economy or the oppression of other nations. It doesn't. Its about the inability to really get down and enjoy life anymore. The simple things are the ones most taken for granted, yet the most integral to our existence. Nations rise and fall. Life goes on. Sure, I mean if some other nation invaded ours and took over, we'd be speaking another language and we'd be all oppressed and whatever. Who cares? We'd still eat food, every day (hopefully). And, god damn it, some one still has to cook.
I actually feel very blessed to be able to come home to my little apartment kitchen. It's like a heavenly escape, with delicious tastes and smells and textures. It really doesn't get much better than this. 
Yes, these are the kinds of things I think of when I get up in the morning.

And now... for a cup of freshly ground and brewed coffee.

Friday, January 13, 2012

Toad in a Hole

I know most of you call it 'Egg in a Hole' or some other derision of that. But this is Toad in a Hole, which is more fun. This is easy and buttery and delicious and probably healthy - when you consider pop tarts and cocoa puffs for breakfast, this is healthier.

Serves One
double or tripe recipe for more people
 
Two peices of Bread
A cup with a small mouth (a wineglass works well) or small round cookie cutter
2 Eggs
Butter
Garlic Salt, Pepper

Heat a pan to medium. Cut circles out of the middle of each piece of bread with glass, set aside centers. Drop 1 tablespoon or so (a dollop?) of butter into the hot pan. As the butter melts, place each slice of bread into the melted butter. Drop centers in to remaining melted butter (add more butter if needed). Crack 1 egg into hole in each piece of bread. Add a few dashes of garlic salt and pepper, or whatever seasoning you like on eggs.
Cook eggs for two or three minutes per side, depending on how you like your eggs. I like mine over medium so I cook them for a minute or two, till the bread is browned and the back of the egg is cooked, then flip it and cook another minute on the other side. Flip centers when browned.
Serve hot toasts with toasted centers for dipping into egg yolks. Or just eat them with jam, they're delicious!

Thursday, January 12, 2012

Fish N Chips

Good Fish n Chips is hard to come by in the states, unless there's a good British pub nearby. This recipe is pretty darn good. Made it for 6 people tonight and it turned out very satisfactory. I used a deep fryer but you can use a stock pot or another deep pot.
The original recipe shows you how to make your own 'authentic' type chips, but I used frozen crinkly fries.
Yum! Based on the recipe from Food.com

Serves 6
12 Tilapia filets
3/4 cup flour
1 teaspoon baking soda
1 cup good beer (about 8oz, beer bottles usually come in 12, so drink the rest!)
Salt and pepper
1 bag of frozen crinkly fries

Heat up deep fryer and a pot of oil on the stove (or two fryers if you have em), for fish and fries while you ready the batter. Turn your oven on Warm. Stir together flour, baking soda and beer with a whisk. Make sure there aren't any flour lumps. Season with salt and pepper. 
Shake fish in some flour (this is important for the batter to stick to the fish). When oil is ready for frying, dip each piece of fish in the batter and then carefully drop in the oil.  I have a small fryer so I only do two pieces of fish at a time. Fry until golden brown, about 3 or 4 minutes, remove with basket or slotted spoon and place on a plate or baking sheet lined with paper towels.
Keep cooked fish in the oven to stay warm while the rest cook.
By the time your fish are done, your pot of fries should be ready as well.

Serve with lemon slices, salt and malt vinegar.

Tuesday, January 10, 2012

Quickish Chili for Two

Looking for something easy to make that you don't have to go shopping for? Grab a few cans of stuff from your pantry, brown some meat, dump it all together and season to taste.
Minus having to wash ALL of the dishes in the house... >.< (insert irritation here)... this only took about 15 minutes to make. Delish and easy lunch, great for cold winter days.

1 can black beans (or any kind of beans really)
1 can stewed tomatoes with peppers (or without if you dont like spicy)
1/4 lb ground beef
spices such as garlic powder, onion powder, cumin, seasoning salt and black pepper
Shredded cheese, Doritos (optional)

Brown beef in skillet, drain. Season meat with cumin, garlic, onion, salt and pepper. Dump in cans of beans and tomatoes, let cook 5 minutes or so to bring up to boil. Should thicken with the bean juice but, if not, feel free to add a little corn starch mixed with water to thicken (or masa with water if you have it). Taste and re-season if necessary.
Top with shredded cheese and Doritos (Cheese is best but I happened to have Cool Ranch and it was good to). You could probably use corn chips too.

Sunday, January 8, 2012

Pho Style Ramen

I'm a big fan of Pho. There is an amazing Vietnamese coffee house in Ft. Worth Texas called Lieu's which not only has nom-alicious iced coffee but, of course, excellent Pho. If you don't know, pho is a noodle soup dish (usually rice noodles) with all kinds of spicy fun stuff you can put in it, like bean sprouts, cilantro, basil, jalapenos, etc.
I made some 'fake' pho for lunch. I call it Poor Girl's Pho. Because I'm a girl.


Poor Girl's Pho
serves 1
1 pkg dry ramen (i used Chicken flavor)
1 egg (optional)
1/4 lb ground beef
A handful of cilantro, thinly sliced jalapenos

In a skillet, brown ground beef and season with salt, pepper and garlic powder. Boil 1.5-2 cups water, add dry noodles (without flavor packet). Cook for a minute or two, stirring to separate noodles. Add flavor packet, stir.
Drop a whole egg into the middle and let simmer until cooked (I like mine with the yolk runny, but you can 'scramble' it by stirring it a little while it cooks).
Serve noodles along with a plate of 'toppings' - the beef, cilantro and jalapenos.
Rooster sauce is always nice too.

Biscuits... Like a Baws

 Why do biscuits from a can taste so good? Things from a can are supposed to be not-good.
Am I right?
Biscuits have always been my evil nemesis when it comes to baking. They always turn out hard like icky buttery rocks and, I hate to say, I'd rather just open up a can of biscuit whoop ass and put those babies in the oven than try to do it myself.
But no more! Today I actually made decently good biscuits. Turns out, it's easy!
The trick is, the dough needs to be wet and handled gently.
No yeast. No rolling. No kneading.

I'm not going to re-type the entire recipe with directions here, but you can find this in Bakewise under 'Touch of Grace' Southern Style Biscuits.

Kayso, of course I did things my way. I don't own self-rising flour or buttermilk. According to the Internet, you can add a bit of melted butter to milk to make Buttermilk (go fig?) and self-rising flour is simply flour with baking powder added to it. So methinks... I can do this.


The first batch was too wet. Made biscuits smaller since the batter was so wet (do they mean large or small curd cottage cheese? when they say soupy, does that mean still lumpy?). Also by melting the butter and adding it to the milk, the milk was WARM where it should be cold which may have contributed to the over-wetness of the dough. 
Very nice flavor though, and I can use these experimental ones for biscuits and gravy!
Useful Lesson #1: 'Like cottage cheese' means the dough is just really sticky (not soupy)
Useful Lesson #2: Make 'buttermilk' 10-15 minutes early and refrigerate to achieve coldness.

The second batch was better. But still too thick, not enough lift to biscuits. Not sure if I added enough baking powder to flour. Try again with two teaspoons instead of one.
Useful Lesson #3: You can make your own 'self rising flour', but pay attention to ratio of flour to baking powder.

The Third Time will of course be 'the charm' but I ran out of cream and I don't have any money until next paycheck.
Useful Lesson #4: Be sure you have enough ingredients for several batches. 

Sorry for the (insert dramatic music) Cliffhanger!!! >.<

Friday, January 6, 2012

German-ish Food

For a few years, I lived in San Antonio, Tx. Nice city, lots of great food. There is a lot of great German food there, since there is a large-ish German community in the area, for some reason. If you're in the area, there's a restaurant I like called Old World German Restaurant (in ye olde country, heh!) on Babcock Rd. Very authentic, and also great pastries. Eat there!

So last night (I didn't blog it because I was drunk at the time) we had semi-authentic German type food. Well I think the potato salad was more or less authentic. The sausages were store bought. But yummy!

Beer Bratwursts with German Potato Salad
Serves two to three people

Brats: 
1 package Beer Bratwurst's (Johnson's usually comes with 5 sausages)
1 bottle of good beer (I like Dos Equis but any beer you'd drink is good)
1 Tablespoon [or so] of butter (optional)

Potato Salad:
3-4 medium sized potatoes (I use large Red potatoes with skin on)
4-5 slices bacon (I'm quite fond of Applewood Smoked thick cut)
1/4 cup vinegar
2 tablespoons water
3 tablespoons sugar
1 tablespoon parsely
salt and pepper to taste

For the Brats - Heat a pan to medium high and sear the sausages on both sides (a minute or two per side), then pour in the beer (about half a bottle), lower heat to medium. Cook 15-20 minutes until liquid is boiled off, turning halfway through so both sides are colored. To caramelize a bit more (optional), drop some butter into the pan and fry  sausages in the butter and juices (be careful not to burn) to get bit of crisp on the outside of the sausage. Yum!

For the Potato Salad:
Wash the potatoes and put them in the microwave for about 15 minutes, cook until soft. Or take the scenic route - slice into chunks, cover with water and boil until soft (10-15 mins). While potatoes are cooking, fry the bacon until crispy. In a large bowl, combine water, vinegar and sugar. When potatoes are done and still hot, add to the liquid and stir so potatoes soak up the flavor. Add crumbled bacon, parsley, salt and pepper to taste.
Alternately, simmer liquid in a pan, add potatoes and cook just until liquid is soaked up. Add bacon, parsley, salt and pepper to taste.
You can fry onions with the bacon if you like onions.

Slice sausages and serve with potato salad on the side :) Eat with Beer.