Search This Blog

Sunday, August 11, 2013

Carrot Noodles

Thats right! Embrace the weirdness, this is happening. 

Most everyone i know enjoys carrots cooked in honey. A wonderful side dish! This is pretty much the same, only you shave the carrot in strips with a vegetable peeler. (Or be fancy and use a mandolin)


Pile the strips into a saucepan, add 2-3 tablespoons of honey and 2-3 tablespoons of water.
Cook on low, stirring occasionally to coat, until carrots are limp and noodly, 3-5 min. Add a pinch of salt (or two-three turns of the salt grinder). 
Serve warm.
Gorgeous! 

-———————

There are probably loads of different ways to use strips of carrot. Two come to mind:

Use as "noodles". Cook them in milk instead of honey (gets rid of the bitter carrotty flavor), drain. Pour a tomato or cream based sauce over. Yum! Vegan/vegetarian.

Alternately, you could spray oil on (sprinkle a little salt) and roast them in the oven to make carrot "chips" or "fries". 

Buffalo Chicken!!!


This one's easy. Just toss the chicken pieces (drumsticks, here; great with any cut of chicken) with 2-3 tablespoons of the seasoning in a gallon size ziplock baggie. Shake to thoroughly coat. 
Bake in 350 degree F oven for 30-45 min till nicely browned and done in the middle.
 OR let "marinate" in the baggie in your fridge up to 24 hours, until ready to cook. Sure, you could freeze them too, just make sure to thaw before cooking.
Whip up some sides and you got dinner!

I used Buffalo Wild Wings' Buffalo Rub (pictured above) It was about $5, bought at the restaurant. 

Sunday, August 4, 2013

Single-Serving Packets of Joy

Freezer cooking. Its all the rage these days with home cooks. Something restaurants have been doing instinctively for years. Nonetheless, its a fantastic way to eat cheaply, healthy and most importantly EASY.
This post is about tonights venture with freezer cooking. I made two simple types of meals: marinated meat and steam packets. 
For the meat- i literally poured half a bottle of salad dressing (italian or soy sesame vinegarettes) in a gallon size ziplock freezer bag along with a couple of  chicken thigh quarters. Thaw and Bake these at 350 in the oven for 40-45 minutes. Or dump frozen in a slow cooker for 4-6 hours on low. Add some sides and you got dinner for two.
Each of these is two portions of chicken.

I also did some good-ol steam packets. Not a new concept but one that doesn't seem to be used by the home chef all that much. Don't know why, it's super simple! 
Step 1: Make a square of foil big enough for your ingredients. I did about a 12x10piece  of foil, for one serving. Place on 1 serving of chicken. My coupon friend and i went shopping today and she introduced me to an insanely good deal on chicken breast. Its thin cut, but the price per pound was cheaper then even buying whole breast! I'm in awe of this lady's money saving skills!
Anyway...uhhh tangent. Do this with fish too! Its marvelous! 
Step 2: Add frozen veg and seasoning. U can use fresh veg too, here, its all getting frozen anyway. I used a big handful of frozen California Blend that i got at walmart for like 7-8$. I had a Mediterranean seasoning blend that i sprinkled over all. Whatever you have is good though any kind of seasoning blend or, if you want to be fancy, garlic powder, onion powder, salt, parsley, basil, thyme, oregano, mustard powder... I think thats whats all in the one I used. 
Two 1/2" ish pieces of butter... Because.. Butter! Yeesss you can use olive oil too, you yuppies!! 


Step 3: Fold... Freeze. I fold mine like a (badly) wrapped present. Doesn't matter how you fold it, so long as you make sure the juices stay in the packet. Placing in a gallon size ziplock baggie makes em last longer jn the freezer, keeps it from getting burn. Highly advise doing this unless you know youre using it in the next day or two.

Step 4: Cook.  Bake at 350 degrees for 35-40 minutes, until chicken is cooked through. 
If youre doing fish, pop it in the 350 degree oven for 25-30 min till fish is opaque and flakes easily with fork.

Serve with rice or garlic bread, or try slicing it and serving with pasta+some fancy cheese. Nom. 

Tuesday, July 2, 2013

Fish Dinner


 Fish Dinner

When I want to make something quick and light, I typically turn to salad or fish. Tonight, it's fish! The whole dinner probably takes about 30 minutes from start to finish, including thawing the fish.
Actually, it takes longer to get the 5-year-old to eat her veggies than it does to prepare this!
 

 Served 2 and a half 
(2 Adults, 1 5-year-old)
Ingredients 
5 peices of Tilapia, thawed* (or fresh, if you're lucky enough to get a hold of it)
2 cups frozen mixed vegetables (I used California Blend) 
1-2 tsp Goya's Sazonador Total seasoning blend
2 tablespoons butter
1 tsp olive oil
1 loaf of french bread, sliced in half
2-4 cloves of garlic, chopped or minced
1 tablespoon chopped parsely
1/4 cup butter

Place frozen veggies in a small skillet over medium heat, add 1 tsp Goya seasoning and 1 tbsp butter. Cover and cook about 10 minutes, till veggies are soft and water is cooked off.
Meanwhile, heat a nonstick skillet to medium/medium-high, heat 1 tbsp butter with the olive oil until hot enough to sizzle when you add a drop of water. Add fish, sprinkle Goya seasoning over. Cook about 5-7 minutes per side, until fish is opaque and flakes easily with a fork, and gets little crispy bits on the edges (thats my fav part!). 
Mix 1/4 cup butter with garlic and parsley, spread over bread halves. Place under hot broiler for 5 or 6 minutes until bread crisps and butter melts. Watch closely, it burns fast! Slice as soon as its cool enough to handle. 
Serve fish, veggies and bread all together, family style. <3 Nom.

*To thaw the fish, simply plug your sink and fill about 1/4 way with room temperature tap water. Add the fish packets in. It'll be thawed in less than 10 minutes.  You could also do this in a large bowl or container.

Wednesday, January 2, 2013

Adventures in Pasta!!

I'm really excited about this!! I've been wanting to experiment with pasta for quite a while now - lets just say being a proficient pasta-maker is on my bucket list. I can see myself at the farmers market with bags of home made pastas in simple, elegant flavors, ready for customers to gobble them up... someday! For now, I must put on my science goggles and get down to the task of mastering pasta.

For Christmas, my fiancee bought me a 5qt Kitchenaid Mixer... I will likely make an entire post, later, harping on the awesomeness that is Kitchenaid. For now, I'll just throw out that other mixers really don't stand a chance, when it comes to home use. And its awesome. And its PINK!! :) I love you, Jeremy!

Right, so: Pasta... As it turns out, the stuff is pretty foolproof. You really don't need any special ingredients, being a food item with very rustic basics, you can use whatever you have on hand. 

For the last several days, I've been planning my debut into the world of pasta, looking for decent looking recipes. I shouldn't be surprised that the best one I've found so far has been from Mario Batalli. Good old Mario <3 He is my Italian hero.
This recipe has but two ingredients. It makes a pasta that is chewy and rich, since its just flour and egg. And did I mention you can't screw it up?

Mario's Basic Pasta
makes about 4 servings
 
Ingredients:
3 or 4 eggs
1.5 cups of all-purpose flour (or 10 oz)

1. Dump everything into your (fancy-schmancy-awesome) Kitchenaid mixer, starting with 3 eggs. If it looks dry after you start to mix, add the fourth yolk. If still dry, add the white also. I only used 3 eggs.
(Click here for by hand instructions).
2. Mix everything together until combined, then attach the Dough Hook and mix on medium speed for 15-20 minutes. Cover with plastic wrap, let it sit for 30 minutes.
Tip: I use a large plastic ziplock bag to cover my dough - cut one side and across the bottom to open it up. I can wash it over and over, and it saves me on plastic wrap. 
3. Roll out with your (fancy-schmancy-awesome) Kitchenaid pasta rolling set.
 I used the wide pasta setting to make a fettuccine type noodle. (see picture below)

To cook fresh pasta: drop into salted, boiling, water. Cook 1-2 minutes until tender. Top with your favorite sauce.  


Here are two of my favorite, simple, pasta sauces. They take minutes to make and are delicious!

Basic Tomato Sauce:
1 14.5oz can of diced or stewed tomatoes (with Basil, Garlic and Oregano)
- Open can, heat up, pour over pasta

Roasted Garlic and Olive Oil Sauce:
2-3 tablespoons of olive oil (+1tbsp butter, for richer sauce, optional)
3-4 cloves of garlic, chopped
- Heat oil in a skillet. Add garlic. Fry until garlic browns, 3-4 minutes. Pour over pasta.

I have no qualms mentioning that I am a bit of a food snob... So I recommend using freshly grated Parmesan, never that snowy mess that passes for Parmesan at cheap pizza joints (smells like old socks). Use fresh, quality, ingredients whenever possible, of course - especially since you are using very few ingredients, you want them to stand out on their own and say hello :)

Tuesday, January 1, 2013

Easy Pancit

If you know anything about Pancit, you know its pretty easy to make.So calling this Easy Pancit is almost redundant, but this is my delicious method!
Really Big Pot
Really Big Bowl
My secret method to this dish basically involves a Really Big Pot and a Really Big Bowl. Rice sticks cook very quickly, (you can soften them just with warm water alone), so boiling flavorful stock and then dumping everything together works well since everything cooks quickly. Just let it sit a few minutes until the noodles absorb the stock and, voila! Pancit!!

 Ingredients:
4 cups water
4 bullion cubes (or omit the water and use chicken stock)
4 boneless skinless chicken thighs, sliced thin
1/2 bag of jumbo shrimp (optional)
1/2 package of rice sticks, torn in half
1/2 an onion, diced
4 or 5 cloves of garlic, chopped roughly
2-3 tablespoons soy sauce
1-2 teaspoons (a few glugs) of fish sauce
1 small bag of frozen stir fry veggies
1/3 of a small cabbage, shredded
2ish tablespoons of sesame oil (or vegetable oil)

Vegetarian: Just don't use chicken/shrimp, and use vegetable stock instead of chicken stock.


1. Make the stock: Heat a Really Big Pot on high with the 4 cups of water/stock. Add in half the onion, half the garlic, all of the sliced chicken, fish sauce and soy sauce. Let it boil while you prepare the veggies.

2. Cook the veggies: Heat a skillet on high (or if you're lucky enough to have a nice wok, heat that baby up), dump in the frozen veggies.
 Note: as soon as you add the frozen veggies to the pan, it will cool down considerably, thus a very hot pan is appropriate to keep veggies from getting soggy.
Once the veggies start to cook (are mostly-not-frozen anymore), add in sesame oil, cabbage and remaining garlic and onion. Stir fry the until they start to crisp or char just a tiny bit on the edges.
Remove veggies to Really Big Bowl.
 If you're using shrimp, go ahead and cook them real quick while the pan is still hot. I like to use a tablespoon or two of butter for flavor, but you can use oil or just a nonstick pan, too. It takes maybe two minutes per side, until they turn pink and curl up and get a nice crispy edge on them. Add those to the bowl.

3. Bringing it all together:  Add the dry rice sticks to the pot of hot liquid. Wait a minute or so, then carefully stir the noodles into the stock until they soften. Let cook for two or three minutes, stir often and dont let them stick to the bottom!
Here is the fun part. It can be a little messy so be careful (this is why we use a Really Big pot and bowl)... Dump everything in the Really Big Bowl and mix together with a couple of forks or chopsticks. The noodles may not mix very well with everything else, but be sure and stir it all thouroughly. The mixture will be a bit soupy.
Put a towel or something on the top of the bowl to cover and prevent all the heat escaping. Wait 5 or 10 minutes, then stir it all up once more before serving; the rice noodles will absorb all the tasty water and its ready to eat!

If you wanna be fancy, serve this with lemon wedges :)


Monday, December 31, 2012

French Croissants


 Got a chance to visit France whilst on deployment with the Navy, and O-M-G there is a reason why France is the pastry capital of the world!! The first real pastry I had there was the croissant, a flaky, fluffy, buttery roll named after its crescent shape. BEST FOOD EVAR! One could easily live off these things (Who said man cannot live on bread alone? That's just silly.).

I had a few other yummy treats in France, but these babies are definitely on the top of my list of delicious pastries.  They are a bit labor intensive, but if you are a kitchen-holic like me, its not a problem to do a little work on them every day for two or three days.
They can be customized a lot of ways, too - add jam or chunks of chocolate in the middle, then roll up, for a sweet treat. Also I'm sure most of you have heard of 'pigs in a blanket', which is probably a white American thing - usually a hotdog wrapped in croissant dough, with cheese or whatever. For a savory snack, you could totally do these fancy-schmancy with some fancy sausage and hard to pronounce cheese, or something like that. Or... y'know... hot dog and American cheese. Whatever floats yours.
It sure beats the hell out of out-of-the-can Pillsbury type, lemme tell ya. Though the process may be intimidating for those who only dabble in pastry, PLEASE TRY THESE because you wont regret it.

Recipe and pictures for steps copied from Daily Delicious blog

Ingredients:
1¼ teaspoon of dry-active yeast (about ½ sachet)
3 tablespoons warm water
1 teaspoon sugar
1 3/4 cups of bread flour
2 teaspoons sugar
1½ teaspoon salt
½ cup  milk 
2 tablespoons canola oil (or other tasteless oil)
½ cup (1 stick) chilled, unsalted butter
1 egg, for egg wash


1. Mix the yeast, warm water, and first teaspoon of sugar in a small bowl. Leave aside for the yeast and sugar to dissolve and the yeast to foam up a little.
2. Measure out the other ingredients
3. Heat the milk until tepid (either in the microwave or a saucepan), and dissolve in the salt and remaining sugar
4. Place the flour in a large bowl.
5. Add the oil, yeast mixture, and milk mixture to the flour
6. Mix all the ingredients together using the rubber spatula, just until all the flour is incorporated
7. Turn the dough out onto a floured surface, and let it rest a minute while you wash out the bowl
8. Knead the dough eight to ten times only. The best way is as Julia Child does it in the video . It’s a little difficult to explain, but essentially involves smacking the dough on the counter (lots of fun if you are mad at someone) and removing it from the counter using the pastry scraper.


9. Place the dough back in the bowl, and place the bowl in the plastic bag.
10. Leave the bowl at approximately 75°F/24°C for three hours, or until the dough has tripled in size.


11. After the dough has tripled in size, remove it gently from the bowl, pulling it away from the sides of the bowl with your fingertips. 
12. Place the dough on a lightly floured board or countertop, and use your hands to press it out into a rectangle about 8 by 12 inches (20cm by 30cm).
13. Fold the dough rectangle in three, like a letter (fold the top third down, and then the bottom third up)


14. Place the dough letter back in the bowl, and the bowl back in the plastic bag. 
15. Leave the dough to rise for another 1.5 hours, or until it has doubled in size. This second rise can be done overnight in the fridge.
16. Place the double-risen dough onto a plate and cover tightly with plastic wrap. Place the plate in the fridge while you prepare the butter. 


17. Once the dough has doubled, it’s time to incorporate the butter
18. Place the block of chilled butter on a chopping board.
19. Using the rolling pin, beat the butter down a little, till it is quite flat.
20. Use the heel of your hand to continue to spread the butter until it is smooth. You want the butter to stay cool, but spread easily.
21. Remove the dough from the fridge and place it on a lightly floured board or counter. Let it rest for a minute or two.
22. Spread the dough using your hands into a rectangle about 14 by 8 inches (35 cm by 20 cm). 
23. Remove the butter from the board, and place it on the top half of the dough rectangle 
24. Spread the butter all across the top two-thirds of the dough rectangle, but keep it ¼ inch (6 mm) across from all the edges.
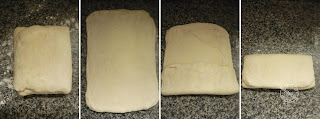
25. Fold the top third of the dough down, and the bottom third of the dough up.
26. Turn the dough package 90 degrees, so that the top flap is to your right (like a book). 
27. Roll out the dough package (gently, so you don’t push the butter out of the dough) until it is again about 14 by 8 inches (35 cm by 20 cm). 
28. Again, fold the top third down and the bottom third up. 
29. Wrap the dough package in plastic wrap, and place it in the fridge for 2 hours. 


30. After two hours have passed, take the dough out of the fridge and place it again on the lightly floured board or counter.
31. Tap the dough with the rolling pin, to deflate it a little
32. Let the dough rest for 8 to 10 minutes
33. Roll the dough package out till it is 14 by 8 inches (35 cm by 20 cm).
34. Fold in three, as before


35. Turn 90 degrees, and roll out again to 14 by 8 inches (35 cm by 20 cm).
36. Fold in three for the last time, wrap in plastic, and return the dough package to the fridge for two more hours (or overnight, with something heavy on top to stop it from rising)

37. Roll the dough in to 5mm thick. Cut into 9x22 cm triangle.

38. Starting at the wide end, roll the triangle up towards the point, and curve into a crescent shape.
39. Place the unbaked croissant on the baking sheet
40. Repeat the process with the remaining dough, creating 12 croissants in total (if you make the same size as me it will be less).

41. Leave the tray of croissants, covered lightly with plastic wrap, to rise for 1 hour
42. Preheat the oven to very hot 475°F/240°C/gas mark 9.
43. Mix the egg with a teaspoon of water
44. Spread the egg wash across the tops of the croissants. 
45. Put the croissants in the oven for 12 to 15 minutes, until the tops are browned nicely
46. Take the croissants out of the oven, and place them on a rack to cool for 10 minutes before serving.


This post was sponsored by Anti-Flag and lots of love.